AO3 News

Post Header

If you're one of the many users moving to AO3 from other fandom spaces where English isn't widely used, we'd like to welcome you—we're so excited to have you! AO3 has some features that may not work the way you're used to, so we'd like to take a moment to go through some of the basics.

Creating an account and introducing yourself

Everyone is welcome on AO3! You don't need to contact Support to provide your fandom history when you want to create an account. If you don't have an account and would like one, check out How do I create an account? Once you're logged in, you have full access to all content on the site.

If you'd like to introduce yourself, you can add that information to your personal biography on your profile page once you're logged in. Check out the How do I edit my profile? question in our FAQ for help! Be aware that any information you add to your profile is available for anyone to access, whether they're logged in or not.

Adding your works

If you'd like to move your works from other forums or blog sites to AO3, you can copy and paste your work manually, or you can use our Import tool. Unfortunately, importing from many sites will bring across a lot of unnecessary code.

We ran a test import from Lofter—a popular site among Chinese-speaking fans—and we've detailed the instructions below, including how to remove the excess code. These instructions may work with other blog sites as well.

  1. When you're logged in, select "Import Work" from the "Post" menu at the top of the page.
  2. Enter the URL(s) of the work(s) you want to import in the first input field.
  3. You shouldn't need to change the custom encoding.
  4. Under "Import as" you can choose to import the URL(s) you entered as separate works, or as chapters in a single work. The default is to import them as separate works.
  5. Under "Preferences", don't select "Post without previewing" as you will need to make edits to the draft. You can choose to "Lock all imports to registered users only" if you would prefer only AO3 users have access to the work.
  6. Select the Rating, Warnings, and Fandom(s) that apply. Note these selections will apply to all the URLs you import. You can edit these later, if necessary.
  7. Fill in any of the other tag options—you can select the blue question mark icon for an explanation (in English) of each of these fields. You can also reference the FAQs (linked below) for a translated explanation.
  8. Enter any Author's Notes you want to include.
  9. Select "Import".
  10. Edit the draft work.
  11. Delete all lines of text and code before the first word and after the last word in the body of your work.
  12. Make any other formatting adjustments as you like. You can select the button "Rich Text" to get a better idea of how the work will appear on the screen.
  13. To save your changes you can:
    • Select "Preview" to check you're happy with the work and then "Post" to publish it, or
    • Choose "Post without Preview" to publish it immediately.
    • To keep it as a draft, you can select "Save Without Posting". Note that a draft is automatically deleted 30 days after it was created.

Our Tutorial: Posting a Work on AO3 and Tutorial: Importing Text Based Works, as well as the Posting and Editing Works FAQ can also help you with any questions you might have about the posting or importing processes.

Tagging your works

On AO3, fanworks are grouped by fandom (that is, the title of the source canon the fanwork is drawn from), not by character or pairing. You can find some examples of these on our Fandom listing page. Fandom is a required tag for each work, while relationships and characters are optional. Unfortunately, entering your ship tag in the Fandom field makes your work very difficult for other users to find, as the site can't link such works with other works about the same ship.

To make best use of our tagging system, and to allow other users to find your work, here are some tips:

  • Put the name of the canonical source material in the Fandom field. That might be a TV show, book or book series, manga or anime, computer game, etc.
    • If you are writing about a real person, we call that Real Person Fiction (or RPF) and use different fandom tags to represent these works. For example, you can tag with the name of the sports team, band name, or if you're writing about an actor you will likely find a RPF variation on the fandom such as Wicked (RPF).
    • If your work is in two fandoms, or a crossover, enter the two fandom names as separate tags.
  • While Relationship and Character tags are not required, users often search for them, so it's a good idea to complete these fields. You can tag in your own language and we will connect your works with others about the same relationship or character.
    • Relationship canonical (or 'official') tags are sorted alphabetically by the characters' family names, according to the Latin alphabet. The Relationships field does not indicate who tops or bottoms, or who doms or subs.
      To indicate who is top/bottom or dom/sub, you can use the Additional Tags field! In this field, use separate tags for each character and use their full names. For example "Top Todoroki Shouto" and "Bottom Midoriya Izuku".

Hiding your works from search engines

When you post or import a work, you can choose to lock the work so that only those who are logged in to an AO3 account can find it. Check out How do I control who can access my works? for how to do this for new or existing works.

If you're importing works, you can check the box under Preferences next to "Lock all imports to registered users only," just below where you paste in the URL(s) to the work(s) you're importing.

Checkbox to lock your works to logged-in users only

Things you can't post

Currently, our Terms of Service are only available in English, which makes it difficult for users who don't speak English to know what is and isn't permitted on the site. So to help you out, here's a non-exhaustive list of content that we don't allow on AO3:

  • Introduction or blog style posts. Please post your introduction in your Profile, as outlined above.
  • Commercial promotion. You may not solicit money from anyone, either in your works, your profile, or comments on yours or other people's works. It doesn't matter if you're asking for donations, selling commissions or doujinshi, or promoting a published work of which you're a fan. This site is strictly non-commercial.
  • Works that directly attack other fans because of the ships they like. You are welcome to post works about whatever ship you like, and to avoid works about ships you don't. However posting works that are attacks on people who ship something you don't like may be ruled as harassment.

Posting these kinds of works may incur penalties on your account.

Where can I get more information?

Our Archive FAQ, and important announcements are a good place to find a wide range of information.

If you're uncertain about what content is allowed, contact Policy & Abuse. If you have questions about the site that aren't answered in our other documents, contact Support. Both teams will be glad to answer any questions you have.

All of these resources are available in a number of languages!

To access the FAQ or News posts in other languages, go to the main menu (below the name of the site) and select "About" and then "FAQ" or "News."
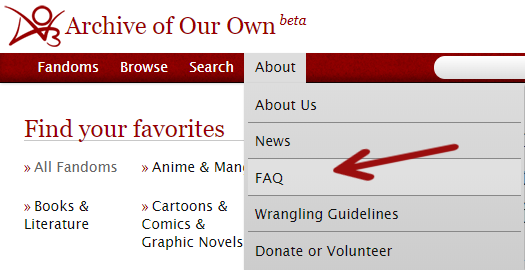
Navigating to the FAQ page

To change the language, select the menu, scroll to the language you'd prefer, and then select the "Go" button.
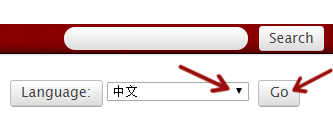
Changing the language

Comment

Post Header

Published:
Thu, 16 Oct 2014 17:54:12 +0000
Tags:

What Are Work Skins?

Works skins allow you to customize the appearance of your works beyond the basic HTML tags the Archive supports. In order to do this, they use Cascading Style Sheets (CSS), a style language that allows you to define a set of rules for how specific HTML elements in your work should be displayed.

This guide will take you through creating and applying a work skin on the Archive. For a more in-depth tutorial on how work skins and CSS work, we invite you to take a look at our tutorial on styling works, or check out some of the HTML and CSS resources listed at the end of this article.

Creating and Applying a Work Skin

1. Create the Work Skin

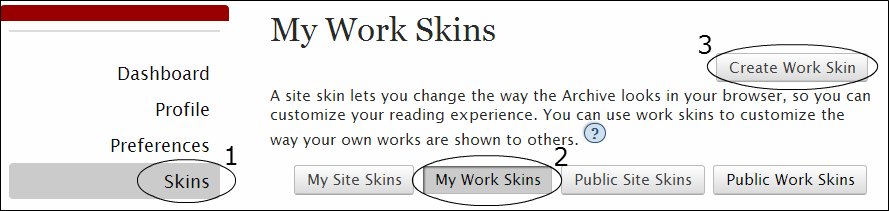
From your AO3 Dashboard, choose Skins from the sidebar, then select My Work Skins. Select Create Work Skin at the top left to open the Create New Skin webpage.

My Work Skins Page

2. Enter Work Skin Information

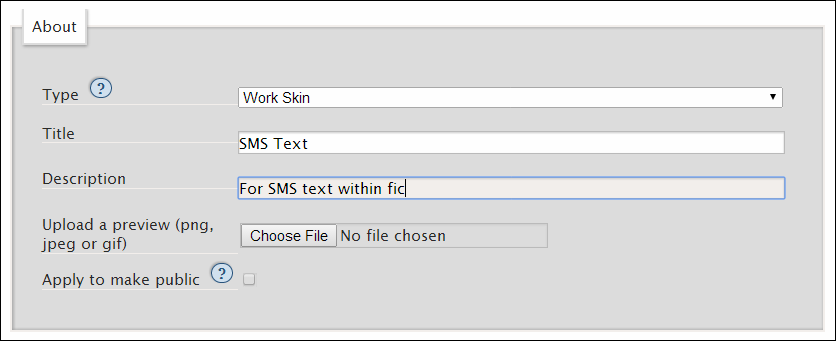
In the shaded area labeled About, ensure that Type is set to "Work Skin". Then, give your work skin a unique title (e.g., "SMS Text"). Optionally, you can also give your work skin a description (e.g., "For SMS text within fic").

About section of My Work Skins Page with example information

Once you have created your work skin, you may want to return to this form to upload a preview image or to apply to make your skin public for the use of other fans. For now, move down into the CSS text box to continue.

3. Write the CSS

CSS allows you to create a blueprint for how you'd like the HTML in your work to be displayed.

For example, using CSS, you can give instructions in one line of code that makes all your paragraphs look like monospaced computer code. As you might already know, you can do the same thing using an HTML code tag on all your paragraphs--but using CSS has a number of advantages over using HTML all by itself.

Firstly, by separating your work's appearance from its content, aesthetic changes are kept consistent. CSS ensures all items with the same labels are automatically displayed with the same settings. As work skins can be applied to multiple works, this feature is helpful in ensuring series are formatted consistently across all works.

CSS also helps you avoid redundancy by allowing you to define rules that will apply to all matching elements within your text, without needing to retype the same HTML over and over. In the previous example, if you wanted to change all your paragraphs to monospace font using HTML, it would involve adding extra HTML code for every paragraph of your work. Using CSS, on the other hand, you could make this change with a handful of CSS lines that would then apply to every single paragraph (p) tag. As such, using CSS in work skins is ideal for customized or complex styling, while still being easily changeable.

Finally, using CSS for styling instead of HTML avoids violating the principle of Semantic HTML--that is, the idea that HTML should be about describing the meaning of content, not its appearance. Semantic HTML is not only easier for humans to read and write, it's also more accessible: people using screen-readers or other assistive technologies to access AO3 will have a much easier time accessing your work if you use CSS instead of HTML for styling.

CSS Example

If this all sounds a little complicated, don't panic! This example will walk you through the basics of CSS styling in relation to work skins.

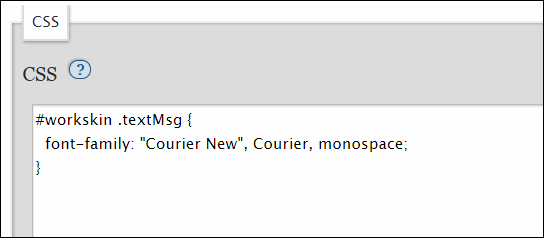
To begin, imagine you want to make the text messages characters send and receive look different from the rest of your work's text. For instance, you might want all SMS text to use a monospace Courier New font, while the rest of your work continues to use the Archive's default font. Using only HTML, this would be impossible, as the Archive does not allow use of the HTML font tag required to select a different font family. Using a work skin, on the other hand, you could easily create a simple CSS rule--a line of code that declares new settings for a particular HTML element--saying that every instance of a newly-envisioned HTML class textMsg should use a monospace Courier New font.

The entire CSS rule could look something like: #workskin .textMsg { font-family: "Courier New", Courier, monospace; }

CSS Example

Let's deconstruct this example.

To start, write #workskin to declare the rule as part of your work skin. This doesn't change, regardless of the kind of rule you're writing.

After this, you specify which section of your HTML the CSS rule will affect; in other words, a "selector". You can apply a rule to any combination of HTML elements and classes. Possible selectors include:

  • Element only: To use an HTML element as your selector, simply write the element name after the #workskin declaration. For example, selecting all paragraph elements (p) becomes #workskin p.
  • Class only: To select all instances of an HTML class, write the name of the desired class preceded by a period. As in our CSS Example, #workskin .textMsg will modify any element in the work with the class name textMsg.
  • Element and Class pair: To select only items with a particular element and class name, combine both methods by writing the element name and the class name separated only by a period: #workskin p.textMsg selects only paragraph elements with the textMsg class.

Following the HTML selector, you'll need to type a left curly bracket ({). This signals the start of your declaration, which defines what your rule is actually going to do.

In the declaration, you write a series of statements that assign a value or values (in this case, "Courier New", Courier, monospace) to a property (in this case, font-family). Your property describes the aspect you would like to change (the font family), while the value you assign it controls the kind of change that will be affected (in this case, changing it to monospace Courier New font style). The two are connected by a colon (:) and the whole statement is followed by a semicolon (;) to indicate that the font-family declaration is finished and complete. You can now type a right curly bracket (}) to close your rule.

In this example, the CSS rule only contains a single declaration; more commonly, rules will consist of several of these statements before closing off. To apply more settings to a single selector, simply end each declaration with a semicolon before defining the next property, and ensure you close the statement with a final semicolon and right curly bracket.

For some more examples of CSS rules and how they are written, you may want to take a look at our tutorial on styling works or any of the other resources listed at the bottom of this article.

4. Applying the Work Skin

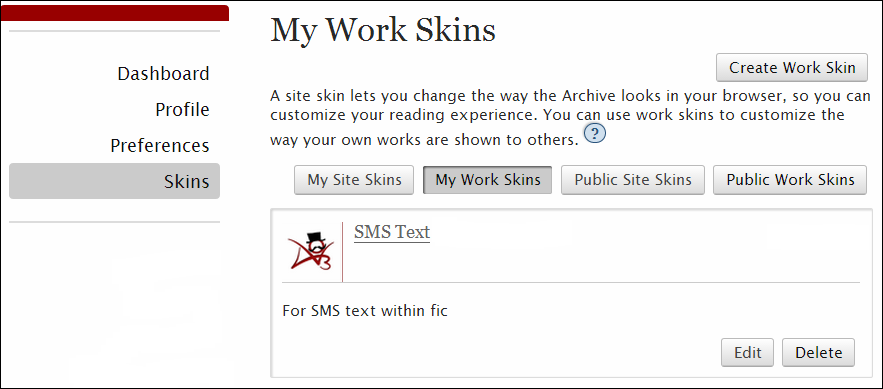
Once you've written your CSS, use the Submit button to create your work skin. Congratulations! It will now show up under the My Work Skins header of the Skins section of your dashboard, where you can edit it to add additional rules, add a preview image, or make your skin public for others to make use of.

My Work Skins Page with example work skin

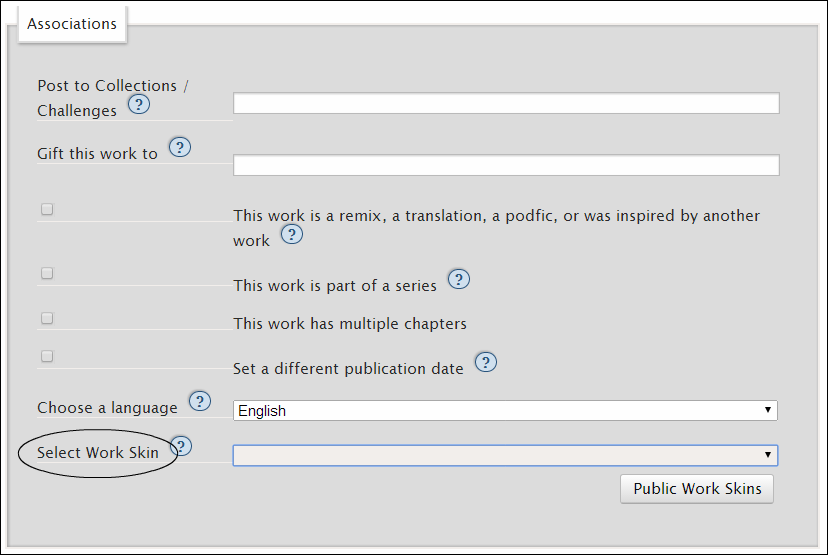
Now that your skin has been created, the next step is to link it to the work you'd like it to modify. In order to do this, you'll need to navigate away from the Skins page to the work in question. Select Edit on the desired work, or create a New Work, and scroll down to Select Work Skin under the Associations heading.

Associations section on Post New Work page

By default, this drop-down box should be populated with two public work skins: "Basic Formatting" and "Homestuck Skin". You should also see any personal work skins you just created listed here. Select the desired work skin and save your work.

5. Formatting the Work

Now that your work and your work skin are linked together, the CSS in your work skin will map onto the HTML elements of your text. For this to work properly, the selectors defined by your CSS rules need to be present in your work.

For example, a CSS rule for paragraph elements (#workskin p { }) will only apply to sections of text in your HTML which are wrapped in the p and /p tags. In this instance, they will work immediately, as p and /p tags are added automatically to your text by AO3's parser. However, this won't be the case for the rules in your work skin which make use of classes or other HTML elements.

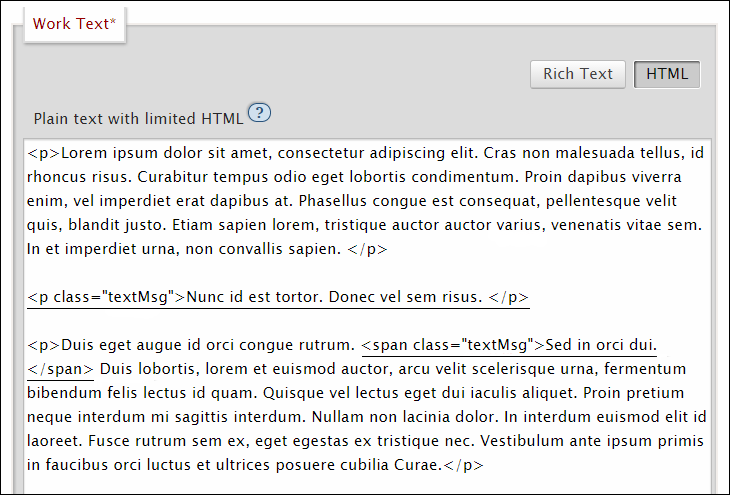
HTML class tags can easily be added to both individual paragraphs and in-line text:

  • Paragraph: To apply the settings of the textMsg class used in our CSS example to an entire paragraph, simply add the class name textMsg to the p tag preceding the paragraph: p class="textMsg". No modification needs to be made to the closing /p tag.
  • Span: To apply the settings of the textMsg class to some text within a paragraph, surround the selected text with span class="textMsg" and /span tags.

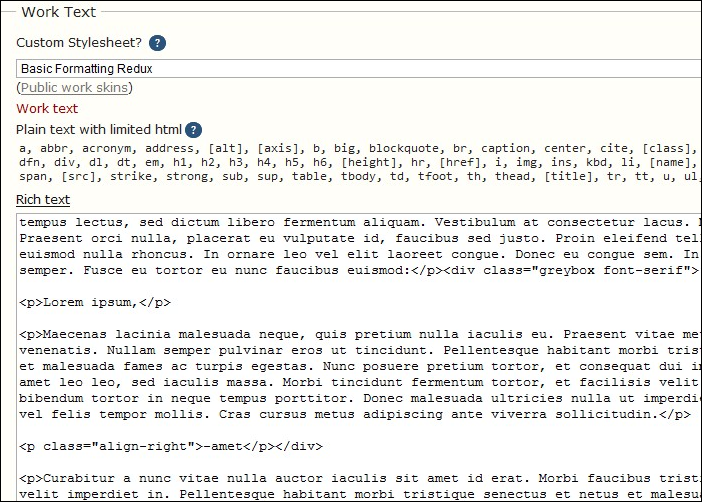
Work Text with included HTML class examples

There are a couple things to remember when adding HTML class tags to your text. Firstly, make sure you're editing your work in HTML mode, not rich text mode, otherwise the changes will not take effect. Secondly, you'll need to use the exact same class name in your HTML as the one you defined in your work skin CSS. Keep in mind these are case-sensitive, so be sure to match the names exactly.

Once you've formatted your text so that it references the items modified in your work skin, hit save and inspect the fruits of your labour. Congratulations! You've just customized a work's appearance on the Archive using a work skin!

Work with applied work skin settings

Useful Links for More Information

Work Skin Resources

Tutorial: Styling Works
Example Work Using Work Skin
Public Work Skins
Homestuck-specific Tutorials

CSS & HTML Resources

AO3 CSS Help
AO3 HTML Help
CSS Tutorial

Comment

Post Header

Published:
Sun, 20 Jul 2014 19:26:17 +0000
Tags:

Banner (by Rachel) displaying the title 'AO3 Unlocked' with an open padlock in the background

We sometimes post little tips & tricks to our official Tumblr to highlight some of the many things you can do with your AO3 account, some of them a little more hidden than others. This is a round-up of some recent posts.

Mini-Tutorials

Other Tips & Tricks

Comment

Post Header

Published:
Tue, 22 Oct 2013 19:11:28 +0000
Tags:

This concludes our little series in advanced searching and browsing! As always, all the tricks and little hacks mentioned here are very much optional. Simply clicking your way through the Archive tags and playing around with the existing filter options will already give you what you're looking for in the vast majority of cases.

For those wanting to build more complicated searches, here's all information in handy list format:

A friendly note to fanwork creators:

As we've said before, you are free to use whatever tags you wish on the Archive. However! Descriptive tags, common concepts that people might want to search and filter for, and a work blurb that is easy to scan when scrolling down a list of works - these will help other users find (and then read, watch, look at, or listen to) your stuff.

For inspiration, you can search through all existing tags by character name, keyword, or phrase. Tick the "Canonical" ticky to only see tags that will show up in the filters! Examples:

Clicking on a tag (e.g. Ichabod Crane/Abbie Mills) will show you how it relates to other tags on the Archive.

Happy tagging!

Comment

Post Header

Published:
Sat, 21 Sep 2013 23:45:28 +0000
Tags:

Users frequently ask us for an easy, clickable option to filter *out* certain tags, or generate a list of works that are either one rating *or* another. Right now, ticking boxes in the filters will only show you a work if it has *all* the things you have ticked. (And as a work cannot be both Explicit and Mature, you can only pick one rating, not two.) Creating an interface that does everything and is also a) easy on the eye, b) accessible to screenreaders and other assistive tech, and c) not entirely reliant on JavaScript is not an easy task, and it will be a while yet before we can offer this.

However, we previously showed you a workaround using the 'Search within results' field in the Sort & Filter sidebar. Using a simple minus sign, you can exclude anything you don't want, or you can string together things with an uppercase OR to find all works that have at least one of those.

As this relies on text matches across all tags, summary, and notes, putting in -Explicit will also hide works from you that are rated Teen, but include something like "This will get explicit in later parts!" in the notes. Or, as mentioned in our last post, "Derek/Stiles" will also match a list of tags containing "Derek, Stiles" in that order.

There's a way you can use our expertly wrangled tags in the 'Search within results' field, but it requires you to look up a tag ID. Right now, this is only possible for Fandom, Character, and Relationship tags. Those have feeds, which contain the tag ID:

On the Derek Hale/Stiles Stilinski works page, you will find a 'Subscribe to the feed' button towards the upper right. The feed link will give you a number (as part of its URL). Now copy the number and you can do this:

  • "teen wolf" -filter_ids:264659

This will use the tag's structure to exclude any works with this tag *and* its synonyms, e.g. "Sterek" or "Derek/Stiles", but since it's not a text match it *won't* accidentally exclude works that have "Derek Hale, Stiles Stilinski" somewhere else in the tags.

And while we're blowing your mind, you can do the following to only show works that have *no* pairing tags at all:

  • -relationship_ids:*

(Search results that do contain a pairing are due to tags that aren't indexed properly or have no canonical version. But close!)

Obviously, most Archive users will never need these little hacks! The tags, search form, and filter options already allow you to drill down to content you like with just a few button clicks. However, if you do find these extra options useful, but don't want to type them into the box every time you do a search, there's an unofficial userscript for you! It will automatically perform your prefered search when you open a list of works. Give it a whirl if you use Firefox or Chrome.

(We have collected more unofficial userscripts and other tools in our Cool Stuff FAQ, including an AO3 Savior script which will automatically hide works that contain certain words. Tumblr users might be familiar with the concept...)

Comment

Post Header

Published:
Sat, 14 Sep 2013 00:24:26 +0000
Tags:

When we brought back the tag filters after their long sleep last year, we tried to keep the interface as uncluttered as possible and focus on frequently used or requested search options. Like the Archive itself, this is a work in progress. There's a lot of scattered documentation about finding stuff to read, look at, watch, or listen to on the Archive: The little blue question marks all over the Archive should provide some pointers, and there's also the Searching and Browsing on the AO3 tutorial for more details.

However, there are some "secret" search options that are already built into the filtering and search code, but aren't necessarily reflected in the interface (because ticky box overkill). Here's an overview of neat things you can put into any of the following places to narrow down (and sort!) your results:

  • the "Search within results" field in the tag filters for works (e.g. for the Pacific Rim tag or in the Dark Agenda collection)
  • the "Any Field" box in the Work Search form
  • the main search box in the header

For Works:

  • words:1000 (works with exactly 1000 words)
  • words>1000 (works with more than 1000 words)
  • words<1000 (works with less than 1000 words)
  • words:1000-5000 (works between 1000 and 5000 words)

(works for: words, hits, kudos, comments, bookmarks)

  • sort:kudos (sort by kudos, default to most kudos first)
  • sort:>kudos (reverse to fewest kudos first)
  • sort:words (sort by words, default to longest works first)
  • sort:>words (reverse to shortest works first)
  • sort:>posted (oldest works first, going by actual posting date)
  • sort:>updated (oldest works first, going by author's publishing date)

(works for: author, title, posted, updated, words, hits, kudos, comments, bookmarks)

  • restricted:true (only restricted works; requires you to be logged in)
  • complete:false (only unfinished works/works in progress)
  • expected_number_of_chapters:1 (only one-shots)
  • -expected_number_of_chapters:1 (only multi-chapter works)

For (Your) Bookmarks:

  • private:false (your public bookmarks only)
  • private:true (your private bookmarks only)
  • rec:false (everything but recs; works for any bookmarks)
  • bookmarkable_complete:true (bookmarks of completed works only)

Search Operators:

These will handle any text matches in the title, summary, notes, and list of tags. Note that there will be some inaccuracies due to the way the code stores information and handles search strings: "Derek/Stiles" will also match a list of tags containing "Derek, Stiles" in that order. (Please stay tuned for Part 2 for a workaround!)

  • kittens
  • "needs hugs"
  • "kink bingo"
  • m/m OR f/f (works tagged either M/M, F/F, or both)
  • explicit OR mature (most of the porn)
  • -death (exludes works with 'death' in the title, summary, notes, or tags)
  • -rape -"dubious consent" -"consent issues"
  • -crossover -fusion -"alternate universe"

Mix and Match:

These were put into the main search box in the header to generate results, but you can also use these tricks in the "Search within results" field to narrow down work lists for a particular tag. Just remember to put everything into one of the three search boxes listed above.

Happy browsing!

Comment

Post Header

Published:
Thu, 10 Jan 2013 17:46:57 +0000
Tags:

Hi, 852 Prospect authors!

The 852 Prospect is still moving to the AO3 due to the state of its software (read more about this in our first post about the move), but there have been some unexpected delays with the code needed to do the automated import happen. For that reason, the Open Doors Committee will be emailing AO3 invitations (and explanations) to all of the 852 Prospect authors in the next few weeks. This will allow any interested author to set up their own accounts and import their stories to the 852 Prospect collection on AO3 if they don't want to wait. If you no longer have access to the email address you used on 852Prospect.org, or if you have questions not answered by this post, you can always contact Open Doors. (If you have verified your new address with Open Doors before, you don't need to do so again.)

To avoid duplicate stories when the rest of the collection is auto-imported in the near future, we request you post them using the manual URL importer feature. Doing it this way will ensure that all of the comments, kudos and hit counts will be on one story and that readers following old links from 852 Prospect will get to your stories easily.

To help you do this, you can read the Archive FAQs on Importing, Collections and Tags, and the short FAQ below.

There will also be two public chats, hosted by the Open Doors and Support committees, on Campfire (the online chat platform the OTW uses). The first will be on February 2 at 22:00UTC. The second will be on February 10 at 01:00UTC. (Click the links to see when the chat is being held in your timezone). You can access OTW’s public chatroom using this guest link.

How do I add my stories to the 852 Prospect Collection in the Archive?
How do I import stories from 852Prospect.org?
How do I search within the 852 Prospect Collection?


How do I add my stories to the 852 Prospect Collection in the Archive?


For stories already posted on the Archive of Our Own:
1. Access your dashboard while logged in and click on "Edit Works".

2. Select the stories you would like to add to the 852 Prospect Archive collection, and click "Edit".

3. In the second gray box, there is a field for "Add to Collections". Start typing "852 Prospect Archive"; it will pop up as a suggestion. Click on it.

4. Down at the bottom, click "Update All Works".

5. Because the 852 Prospect Archive collection is moderated, your story/stories will not be added right away.

While importing stories to the Archive of Our Own:
1. While signed in, go to the 852 Prospect Archive collection page (http://ao3-rd-3.onrender.com/collections/852_Prospect_Archive) and click on the button in the upper-right hand corner, "Post to Collection".

2. Import your story using the "Import From An Existing URL" feature. (See below for instructions.)


How do I import stories from 852Prospect.org?


1. While logged in, click on the "Post New" button in the upper-right hand corner.

2. On the next page, click on "Import From An Existing URL Instead?" (also in the upper-right hand corner).

3. Copy the URL of your story on the 852Prospect.org website, and then paste into the window for URLs.

4. Select your story rating (required); pick one of five choices:
Not Rated: Select this if you do not wish to rate your story.
General Audiences: For stories on 852Prospect.org that were rated Gen or PG.
Teen and Up Audiences: Select this if you would like to rate your story for PG-13 audiences.
Mature: For stories on 852Prospect.org that were rated R.
Explicit: For stories on 852Prospect.org that were rated NC-17.

5. Select applicable warnings for the AO3 (required). (Any other warnings you would like to add to your story can be added under Additional Tags.) There are six choices, mark all that apply:
Choose Not to Use Archive Warnings: Select this if you do not wish to assign warnings to your story.
Graphic Depictions of Violence: For stories on 852Prospect.org that had a "violence" warning, or otherwise contain scenes of graphic violence.
No Archive Warnings Apply: Select this warning if you do not believe the AO3 warnings apply to your story.
Rape/Non-Con: For stories on 852Prospect.org that had a "rape/nc" warning, or otherwise contain rape or non-consensual elements.
Underage: Select this warning if your story contains an underage person in a sexual relationship with another character.

6. For "Fandoms" (required), start typing "The Sentinel" and it will appear as a suggestion. Click on it. (Add other fandoms if applicable.)

7. For "Category", please select whichever you feel are applicable, or else none:
F/F: Female/Female
F/M: Female/Male
Gen: General: no relationship, or containing relationships which are not the main focus of the work
M/M: Male/Male
Multi: Any combination of relationships, multiple partners
Other: Other

8. For "Relationships", start typing one character's name and select the correct suggestion.

9. Add any other tags (warnings, or tags that mirror 852Prospect.org categories) that you see fit under Additional Tags. Please note that Additional Tags should not be hyphenated. (For a list of all the tags currently in use within The Sentinel fandom, see this page.)

10. Click "Import". It will take you to a preview screen of the story you imported (or, if you entered multiple URLs, links to preview screens for the stories you imported). On the preview screen for each story, there are four choices down at the bottom:
Post: Click this if you are happy with the formatting and would like to post.
Save Without Posting: Click this if you would like to save this story to your draft folder, to edit/post another time. (Please note, drafts are only saved for a week from the day they were first created.)
Edit: Click this if you would like to edit the story before posting.
Cancel: Click this to cancel, and start over another time.


How do I search within the 852 Prospect Collection?


To search within a collection, make sure you are on the 'works' view of a collection. You can browse to the 'works' view of a collection by clicking 'works' on the sidebar of the collection. You can search within the collection by clicking 'search within results' on the right hand side of the page, within the filters sidebar. This searches all the fields associated with a work in the database, including summary, notes and tags, but not the full work text. There are special characters you can use to further customize your results; the '?' button explains them in more detail.

Comment

Post Header

Published:
Thu, 08 Nov 2012 07:51:00 +0000
Tags:

We have shiny new tag filters and a new, improved Advanced Search form! See below for a few tips searching and browsing on the new-look AO3!

Browsing via tag filters

The new tag filters look similar to our old tag filters, but they have lots of greatly-improved code behind the scenes, and a few visible tweaks to improve performance. You can use the filters to browse for works on the AO3 - see below for a few tips on how they work and how to find what you want.

Select a fandom

The first step of browsing is to select a fandom to help us narrow down the results. (If you're going in search of crossovers, then just pick one of the fandoms you'd like to see included in the crossover - you can add the others later.) You can also filter from a Character or Relationship tag to start with a narrower selection, or even an Additional Tag, such as Kinks.

Narrow down your results

Once you've selected, for example, a fandom, you can narrow down your results further by filtering by Rating, Warning, Category, Fandom, Character, Relationship, or Additional Tags. The filter boxes will show the ten most popular tags for each category. This is different to the old filters, which showed all the tags for each category; this created impossibly long filter options and was a drain on performance, which is why we've limited the options.

If the tag you want isn't showing in the filters, you have two options:

  1. Type the tag you're looking for in the 'Other Tags' box. Some suggestions will come up in autocomplete to help you out, but if what you want isn't among the suggestions, you can type it in yourself. (Note that tags that don't appear in the autocomplete are non-canonical and may not always give expected results.) All types of tags can be mixed and matched: John Luther (character), The Losers (2010) (fandom), Crossover (additional tag) can all be entered in the same text field and will all be factored into your filter results.
  2. Select some options from the available choices to narrow down your results, then filter again. For example, if you start with Stargate - All Series you'll get filters showing the top ten characters across the whole of the Stargate universe, including characters from Stargate SG-1 such as Teal'c. If you select 'Stargate Atlantis' and filter again, the filters will show you only the top ten characters from Stargate Atlantis. You can drill down to get more and more specific filter results.

Please note that selecting multiple options in the filters will always produce an AND search - so if you select 'Naruto', 'Bleach', 'Mature' you'll get works tagged with Bleach AND Naruto AND with the Mature rating. If you want to add OR or NOT options to your browsing, you'll need to use the 'Search within results' option.

Search within your results

A search box has been added to the filter sidebar that mirrors the search box at the top of every page. It will search all types of tags plus summaries and notes for the keywords you put in, and narrow down the results to only those matches.

Unlike the ticky boxes and the autocomplete field, this search box allows to you to generate results containing one thing OR another, not both of them. So, ticking 'Thane Krios' and 'Liara T'Soni' on the Mass Effect page will find you only works that contain both characters. Leaving the tickies alone and entering Thane OR Liara in the search field will find you works with one or the other or both. You can ticky any of the other boxes, e.g. only Explicit works and only F/M pairings, to narrow down your search results, and pick a sorting option. Note that this field only searches within your selection, so if you're already on a fandom page, adding unrelated fandoms in an OR search won't add works from these fandoms to your results.

Conversely, you can use the NOT search operator (or the minus sign "-") to specify things you don't want to see in your results. So, for example, on the Death Note page you could ticky "Mature" in the Rating options and "L/Yagami Light" under Relationship, and then enter -"major character death" or NOT "major character death" into the search field. This will exclude works with that warning.

Sort your results

You can use the drop-down box at the top of the filters to order your results. This replaces the sort options which used to show at the top of your list of results - we've moved them into the filters so that we could include a lot more options. As many users have requested, you can now sort by the numbers of kudos and comments a work has received and the number of times it was bookmarked, in addition to word count, hits, title, date posted, and date updated.

One downside of moving this to the filters is that you can't reverse sort order (e.g. starting with low word counts instead of high) with a second click on the button anymore. However, you can now browse through all the works returned with a given search, so you can go to the last page of results and work backwards to get the same effect.

Filter bookmarks

You can now browse bookmarks using the filters! First select a fandom, then hit the 'Bookmarks' button on the page of results. You can then use the filters in much the same way as if you were browsing a list of works, but you'll find two additional options: you can browse Recs only, and you can choose to show only bookmarks with notes. Note that you don't have the same sorting options as for works (kudos, hits, title etc.), as those belong to the work, not a bookmark. You can, however, sort by the date the bookmarked item was updated and by the date the bookmark was created.

Another much-requested improvement is the ability to filter your own personal bookmarks. You can use all the same filter options when looking through bookmarks you created, and sorting by Date Updated will show you at a glance which of your bookmarked works has new chapters waiting for you. Hurray!

Advanced work search

Advanced search is still much the same behind the scenes, but the search form has been radically redesigned to make it easier to access the Archive's powerful search capabilities. Upon popular request, we've also added sorting options to your search results! By default, best matches will be listed first; you can change the sorting order before submitting your search by picking another option from the drop-down menu.

Search fields

The search fields are now grouped into topical chunks roughly along these lines:

  • General information about the work (title, author, language, posting date, completeness, etc.)
  • Tags attached to the work (ratings, warnings, fandom, characters, additional tags, etc.)
  • Stats concerning reader interaction (hits, kudos, comments, etc.)

Each section is broken down into separate fields for each kind of tag (Fandom, Character, etc), with ratings, warnings, and categories displayed in the form of a drop-down menu and checkboxes. You can choose to enter options in all these categories, or just in one, to get precisely what you're looking for.

Where applicable, an autocomplete will suggest tags as you type. If the autocomplete doesn't offer the option you want, you can type it as free text.

Boolean searches

By default, each search term you enter will be searched for as an AND search, i.e. will be treated as if you're looking only for a work that has ALL these things.

If you want to exclude some terms, or look for works containing one term OR another, add your search terms to the 'Any field' and use the search operators NOT (or minus sign: -) and OR (or two pipe symbols: ||). All spaces between search terms will automatically be interpreted as the AND operator, although you can also add the AND if you like.

Searches with quotes

Search terms consisting of more than one word, such as "Riza Hawkeye", or containing characters like / or -, such as "X-Men", will return more accurate results when surrounded by quotes.

We plan to add more enhancements to search and browse in the future, but we think this new system will be much more flexible and useful than before. Happy browsing!

Comment

Post Header

Published:
Thu, 01 Mar 2012 21:13:59 +0000
Tags:

One of the Support tickets we're seeing more of is "How do I post my multimedia works?" It's not yet possible to host vids, art or soundfiles on the Archive, but you can embed works hosted elsewhere, so we wanted to let you know more about how to do that.

All information is current as of November 2019, and is subject to change as we move forward.

Tags and Finding Audio-Visual Works

Right now, the best way to help people find your multimedia works is by adding the information in the Additional Tags Field. The current 'canonical' for audio fics (podcasts, audiobooks, and other such works) is the Tag Podfic, which has subtags for most of the file types (canonicals are the tags which show up in our browsing filters - other variants of the tag are hooked up to that so it finds them all). There is also a Podfic Available tag for authors who have audio versions of their work posted by another author or on another site. We also have a tag for Fanart, with many different subtags.

There is already a lot of video under the Fanvids tag. Some are links to the works posted off-site, but many are embedded in the Archive and can be commented, kudosed, bookmarked, and shared!

We are discussing behind the scenes how to categorize audio/visual media works as we expand this aspect ofin the future, and at some stage will ask for public comment, so keep an eye out for that! Until then, you can use these tags to find your favorite works in new forms, or tag your own works so others can find them!

Posting a New Multimedia Work

Right now, we don't have on-site hosting, so you'll have to host your file at another site such as Vimeo, YouTube, or your own website. You can always just create a link in your work so a user goes to your hosted site, but where's the fun in that? Here's what you need to know if you want to just press play!

Using Embed Code from Other Sites

The HTML Sanitizer we use runs a very tight whitelist on sites we allow to provide media code (this is necessary in order to ensure we don't let malevolent code slip by). If it's not posted to one of these listed sites, the Sanitizer will delete the embed code entirely.

  • archive.org
  • criticalcommons.org
  • dailymotion.com
  • google.com
  • metacafe.com
  • podfic.com
  • ning.com
  • soundcloud.com
  • spotify.com
  • vidders.net
  • viddertube.net
  • vimeo.com
  • youtube.com
  • 8tracks.com

We are currently keeping the whitelist short, evaluating each host site for stability, code vulnerability, content (whether fans are using it), and the size of its user base. (If you know of a site that you think should be on this list, submit a Support ticket and we will submit it for review. This may take a little while, so you may want to use another host in the meantime.)

Some Notes about HTML Code

ETA: We now support the audio and video tags!

There are four ways to embed audio/video in HTML. Currently, we support code starting with the following three tags:

  • <object> - this is the older method that YouTube and Vimeo used to embed video until recently. It's reported to be buggy on iDevices, so use with caution.
  • <embed> - this tag is mostly used for audio, and occasionally to simplify the mess that <object> generates. It's a lot easier to read and compatible with more platforms, so if you have a choice between <object> and <embed>, choose the latter.
  • <iframe> - This is the newest style media embedding tag that we currently support and the most widely accepted for mobile media. Unlike the other tags, <iframe> functions as a separate window within your page to generate the content. This means that a user running NoScript, AdBlock, or similar may have to specifically request to see your media. By default, YouTube, Vimeo, and many other sites will try to give you <iframe>.
  • <audio> or <video> - These are HTML5 tags, and as of November 2019, we now support them! Read more about using them at the announcement post. Note that content using <audio> or <video> are not subject to the whitelist.

If you are writing your own embed code and find a property stripped out that you think should remain, let us know!

Inserting Art

Many websites that host your images will provide the code to embed the image in another site. Just remember that the code has to be posted into the HTML Editor, not the Rich Text Editor. Some sites do provide a lot of formatting in their code. The part you absolutely need to keep is the <img src="... /> portion.

If you prefer to use the Rich Text Editor, you can click on the "Insert Image" icon. You will need the actual link to the image, instead of the whole embed code. It will be something like http://www.host.com/.../image.jpg or http://www.host.com/.../image.png - It has to have the file extension at the end, though!

We currently don't restrict image sources, but there are some tips and tricks, depending on your host site. This is a non-exhaustive list of possible file hosts:

flickr.com
Caution - can be used, but the share link has to be heavily modified to work
dropbox.com
Caution - can be used, but the share link has to be heavily modified to work
deviantArt
Caution - dA's native embed code is removed by the parser, but you can right-click on an image and copy the image URL for the Rich Text editor
, , facebook.com
Not recommended - you can right-click to get direct image links, but image links do change over time with no warning. This breaks the image display.
drive.google.com, onedrive.live.com
Not recommended - does not provide direct image links
photobucket.com, imgur.com
Not recommended - file hosting for embedding is not allowed in their Terms of Service

If you find a site that isn't working, let us know via Support!

Inserting Video

ETA: We now support the audio and video tags!

Like images, most websites that host video for you will provide you the embed code to place in a post - you can just copy and paste this code into the HTML editor of a new work, tag it and post it! (See Known Issues below)

Inserting Audio

ETA: We now support the audio and video tags!

Embedding video is fairly straightforward if you're using the above sites. Embedding audio, on the other hand, requires passing the data through the Archive's public audio player. As of November 2019, we recommend against using the Dewplayer plugin.

  1. Find the direct link to your audio file. The file has to be in the MP3 format - none of the other common audio file types will work consistently.
  2. In your work, in the HTML editor, copy and paste the following:
    <embed type="application/x-shockwave-flash" flashvars="mp3=MP3_FILE_URL" src="http://ao3-rd-3.onrender.com/system/dewplayer/dewplayer-vol.swf" width="250" height="27" allowscriptaccess="never" allownetworking="internal"></embed>
  3. Replace MP3_FILE_URL with the full link to your audio file. Make sure to include the http:// from the address, or the plug-in will be very confused. Also make sure your browser hasn't given you "smart" angled quotes. There are several other player versions available at our post announcing the new player software.
  4. Once you post the work, make sure to press play to verify all the servers can find each other.

Known Issues

  • Pasting with quote marks: Several of the major browsers are converting regular quote marks to angled smart quotes when pasting in code. These smart quotes will be stripped out by the parser, rendering the code unusable and causing the entire embed to be stripped out. You'll need to manually go through the pasted code and replace the "smart" angled quotes with straight double quotes.

The Future

In the future, we would like to provide on-site hosting of multimedia (it's likely that fanart will be the first media type we are able to support).

Comment

Post Header

Published:
Sat, 12 Nov 2011 02:53:21 +0000
Tags:

The new skins on the Archive have lots of spiffy features. We'll be building up documentation on them as we go along, but we wanted to start you off with a few key bits of information!

What public skins are there for me to use?

There's a masterlist of all the new public skins with some brief descriptions of what they do. Many of these skins are designed to affect very specific bits of the Archive - you can chain them together to get the effect you want.

What's chaining skins? How do I do it?

Basically, chaining skins means joining more than one skin together so that you can reuse rules from existing skins and then write your own CSS for the things you want. Some of the skins already on the Archive are built up from more than one skin; for example, if you take a look at Zebra Mono you can see a Parent Skins listing with "Snow". This means that the Zebra Mono skin is using all the code from the Snow skin, which turns all the backgrounds white.

To create a chained skin:


  1. Go to http://ao3-rd-3.onrender.com/skins/new (accessible from your user dashboard).

  2. Scroll down and expand 'Advanced'.

  3. Select 'Add parent skin'

  4. Type in the name of the skin you'd like to use as a parent (for example, if you'd like to base your skin on For the trees type that in). An autocomplete will trigger to help you make sure you get the name of a real skin.

  5. Your parent skin will be loaded first, and anything you put in the CSS box will override the things in the parent skin.

  6. If you want to use more than one parent skin, you can do so, so you could combine, e.g. Don't Care a Button and Wide margins to get a skin which had plain text buttons and wide margins on work pages.

  7. Give your new skin a name and a description (and a preview image if you want to submit it as a public skin, or just for your reference).

  8. Hit 'Create'. You'll be taken to a page which lets you preview or use your skin.

  9. One known issue which will be fixed very shortly, but so it doesn't trip you up right now: if all you change in your skin is the parents, the display won't update, so try just sticking a comment in your css and editing it when you make other changes!

    How can I create spiffy new skins using the new system?

    The skins added with the new code are a good place to start - check out the masterlist of all the new public skins and follow the links to view the code for each skin. For basic skin customisation, simply copying the code of a skin you'd like to use and editing it is often effective.

    If you want to get more complicated, you might find the Archive front end documentation useful for digging into the details of the site CSS.

    If you're working on developing skins, the Firefox add-on Web Developer is a nifty tool which lets you live-edit CSS so you can try out different changes without repeatedly saving and editing a skin.

    Can I see skin creation in action?

    For the visual learners among you, you might like to check out lim's screencast showing the creation of a new skin.


Comment

Post Header

Published:
Thu, 15 Sep 2011 19:23:22 +0000
Tags:

The number one topic for support requests on the Archive of Our Own is the 1000 work limit on search and browse results. This was an early stopgap measure to prevent the servers from going 'splodey, and initially it didn't matter much, because there weren't 1,000 works of anything. But nowadays, if you want to read, say, Stargate Atlantis fic, with over 10,000 works, clicking on "Stargate Atlantis" brings up less than 10% of the available fic. This is understandably annoying to our users!

Eventually there will be fixes to the 1,000 works cap; the problem is being worked on (as evidenced by the 502s, server-'splodeyness is still a concern). Until then, however, there are still plenty of ways around it! If you're a completist trying to see all the fics, here's a few tricks to help you out:

Sort by: at the top of every works list page for a tag (such as works in a fandom, e.g. Stargate Atlantis, or works for a character, relationship, or additional tag) there are various ways to sort. The default is by published date, descending (newest to oldest); you can also sort by author, title, or my favorites, hits and word count. (After the next code update, you'll also be able to sort by the date added to the site - this will make it easier to find works added to the site recently, but backdated to the date they were originally written.) This sort covers all the works under the tag, not just the 1,000 listed. If there are less than 2,000 works in a fandom, you can easily access all of them by reversing the sort order - e.g. click on "Date" and it will sort by oldest to newest, bringing up all the early stories you missed in the first run of 1,000. So I can browse the most recently published Homestuck, and then the earliest published Homestuck, and thus catch all of the 1,600+ HS works on AO3.

I like to sort by word count myself, since I like reading longer stories; sorting by word count in SGA, for example, gives me all the SGA stories on the Archive over 9,000 words. On the other hand, if I'm in the mood for something short, you can click on Word Count again, and it will sort in ascending order (smallest to largest), giving me 1,000 fics all under 300 words.

Obviously that leaves out a bunch of fics in the middle. But there are other ways to browse:

Tags and filters: AO3's tagging system isn't perfect but it's still awfully nifty and convenient now. You can access tags two ways - either by clicking on the tags themselves on any work, or by checking the filters on the right to combine tags (note that the "or" feature is a bit broken; "and" works fine though, if I only want to read mature-rated McShep.) Tag results can be sorted, same as described above (so you can see all the long McShep stories first). Tag results are still limited to 1,000, and there's far more McShep than that - but if you narrow the results further (say, filtering by AU) then you can see all 873 McShep AUs currently on AO3.

One thing to note when using the filters: the work counts you see next to a tag in the right sidebar only are counting the works in that first 1,000. So the numbers will be off - they might only show 300 works, but when you filter by them you'll get many more. So even if a tag only shows a few works, it still might be worth filtering by it. (Also, ways to filter by language and by complete vs WiP are coming soon.)

But wait, there's more:

Search & Advanced Search: Currently there's no way to negatively filter tags in browse (i.e. subtract a tag from results, rather than add it.) This feature is coming, but until then there are still ways to run a negative search, by using search - simply enter a search term with a hyphen before it. E.g. searching "Rodney McKay" -"John Sheppard" will find you fics with Rodney but without John.

In the search bar, a space will equal AND, finding works with everything entered. You can also do OR searches, using |, to find works with either one thing or another, and you can combine these. So searching "Alternate Universe" Homestuck | "White Collar" will bring up works tagged with "Alternate Universe" in either the Homestuck or White Collar fandoms.

The advanced search feature is even more powerful - as well as searching tags, titles, and authors, you can also search for specific word counts, hits, kudos, and date - including ranges, which is useful tool for finding fics in a fandom. For example, you can search for all Stargate Atlantis fics published 5-6 years ago.

The date tool is a bit clumsy for finding all the fics, however; the word count search is probably better for that. To bring up all the fics, start with a range, e.g. 0-200. Then, once you've looked over those results, increment it, 201-500. As long as the results it brings up are less than 1,001, you are seeing all works within those parameters on the Archive. In that way you can fairly quickly go through all the fic in any fandom, or for a specific tag or tags.

A couple of notes about Advanced Search - like the rest of AO3 it's in beta and has its kinks. In particular it has trouble with tags with dashes - if you search for X-Men, for instance, you noticed you'll get lots with X and no X-Men. To get around this, put the tag in quotes: "X-Men". Also keep in mind that presently, unlike filters, searching for tags only brings up works tagged with that specific tag. So searching for "Charles/Erik" only brings up a handful of fics, while clicking on the tag "Charles/Erik" brings up the wrangled tag Erik Lehnsherr/Charles Xavier.

Hopefully this will help improve your AO3 experience! If you have any other tricks and tips, or questions about how to do any of this, please leave a comment below!

This is a modified version of an original post by Tag Wrangling Committee member X-parrot - thanks for allowing us to repost, X-parrot!

Comment

Post Header

Published:
Thu, 08 Sep 2011 15:40:51 +0000
Tags:

The information in this news post is out of date. It is being kept for archival purposes. The Tag Wrangling Committee is working on new documentation that represents the current state of tags. You can view our current wrangling guidelines for more accurate information.

The tag system on the AO3 is an attempt to balance two needs that we feel are important:

  • Users should be able to apply any kind of labels they want to their works and bookmarks.
  • Users should be able to find, sort, and filter works according to tags.

"Tag wrangling" is the behind-the-scenes work that makes both of these things possible at once.

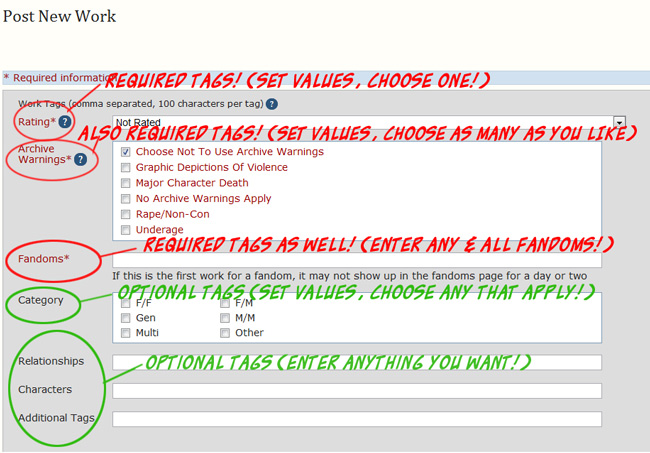
The first thing to know about tags is that all the fields at the top of the "Post New" form, everything before you get to the title of the work -- all of those are tags. A few of them have set values you can choose from (the Category, Warning, and Rating fields); all the others are free for you to type in whatever you want. Fandoms are tags, characters are tags, relationships are tags, additional tags are -- as the name suggests -- tags. The Archive software handles them all the same way.

Screenshot of the tags section in the 'post new' form, indicating that Ratings, Warnings and Fandom are required tags, while Category, Relationship, Character and Additional are optional tags

Since they're free-form text boxes, there's a lot of variation in what people put in, even when they're talking about the same thing. We encourage that variety! You're always welcome to use whatever form you want on your tags. But while other fans are likely to know that "Gurren Lagann" is the same series as "Tengen Toppa Gurren Lagann," or that "SPN" is an abbreviation for "Supernatural," the Archive software doesn't know that automatically. This is where tag wranglers come in!

The tag wranglers' job is to look at all the new tags on the Archive, figure out how they relate to each other, and link them up behind the scenes so that somebody looking for works about a specific thing can find all the works on the Archive without having to look separately for all the different variations. Wranglers have guidelines to make the standardized forms of tags that show up in the auto-complete and the filters, but you should always feel free to use whatever forms you like best: the point of tag wrangling is that users shouldn't have to use any standard forms. For tag-filtering to be possible, the Archive requires some kind of standard form; the forms wranglers have worked out are intended to be as clear as possible for as many users, and are adjusted the more tags we get, as we see how users create and use tags.

Tag wranglers make three kinds of linking. The first kind, synonyms, is pretty self-explanatory; it's hooking tags to the standardized form of the tag, so "Snarry" and "Harry/Snape" are both synonyms of "Harry Potter/Severus Snape". Clicking on any of those tags will bring up the same list of works.

The second kind, metatags, can get confusing (and sometimes leads to users asking "Why does this tag show up in the filters?"). A metatag looks the same as any other tag, but it can call up other filterable tags. You'll see this in fandom tags like "Batman - All Media Types," which is a metatag for "Batman (Comics)" as well as "Batman (Nolan movies)" and all the other kinds of Batman canon. Clicking on the "Batman - All Media Types" tag displays works that use any of its included tags -- so if you've posted a story tagged "Batman (Comics)," it will turn up in filters when somebody is looking for just comics-verse Batman works and also when somebody is looking for all Batman-related works of any kind. Unlike synonyms, metatags only work in one direction, so someone looking only for comics-verse Batman will not see works tagged for Batman movies.

The third kind is currently not visible to users, though as our fabulous coders keep working on improvements, that should change: behind the scenes, tags in different categories get attached to each other, making a map of how they all relate. The Archive knows, for example, that the relationship tag "Zack Fair/Cloud Strife" is related to the character tags "Zack Fair" and "Cloud Strife," and that the additional tag "Community: badbadbathhouse" belongs with the fandom tag "Persona 4." Right now that's just back-end information that the wranglers organize, but we're looking forward to the upgrades that will let everyone use this information for browsing.

All sorts of tag linking are trickier in the Additional Tags field, because it's more debatable what things should be attached to each other, and it's harder to see what other related tags might already be floating around the Archive (as of July 2011, there are over 25,000 not-fandom-specific Additional Tags -- that's a lot to keep track of!). The tag wranglers do their best, but if you find tags that aren't connected where you think they should be, or something that is connected where you think it shouldn't be, please submit a Support request and the wrangling team will investigate.

If making your tags filterable is important to you, here are a few things you can do to make that easier:

    1. Use commas appropriately – use them only to separate your tags and not within the text you want as your tag, as the Archive treats a comma as the end of a tag. If you want to use more than one tag in a category, use a comma between them, including the names of fandoms in a crossover (enter each fandom separately).
    2. Use the tag categories as described above: fandom names in the fandom tags field, relationship tags (either pairings or platonic relationships) in the relationships field, character tags in the characters field. For anything that doesn’t fit into those other categories, use additional tags.
    3. Spell-check your tags before posting – you proofread your works, why not your tags?

For more information on tags, please see the Tag FAQ. If you're interested in Tag Wrangling, we welcome Volunteers!

Comment

Post Header

Published:
Mon, 11 Jul 2011 16:48:00 +0000
Tags:

Please note: Prompt memes are still at alpha stage and are in active development, so you may run into bugs. We're also still refining the user interface. More improvements coming soon!

So you want to participate in a prompt meme challenge? You may already know the one you want; if not you can check out the list of currently open challenges (linked from the main collections index when you're logged in). If an open challenge is a prompt meme challenge you'll see that in the information listed in the information blurb, and the 'Sign Up' button will be displayed.

Screenshot of the blurb for an open prompt meme challenge, reading 'Testing Prompt Memes (testingpromptmemes) by mumble; Mods: Cesy, Tel; Summary: Signups close at: Fri 08 Jul 2011 03:00AM EDT (08:00AM BST); (Open, Unmoderated, Prompt Meme Challenge). A button at the bottom reads 'Sign Up'.

Signing up and leaving prompts

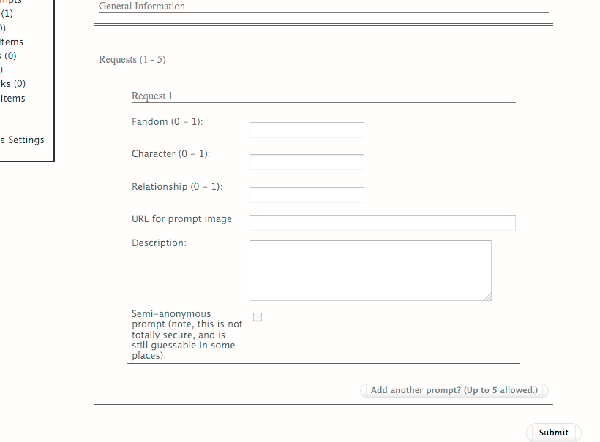
You must be logged in to sign up. When you select 'Sign Up' (on the index blurb, or from the collection page) you'll be taken to a screen where you can enter a prompt for the challenge:

Screenshot of a form headed 'General Information', with fields for fandom, characters, Image URL.

The exact details of this screen will vary depending on how the challenge has been set up, but you will usually need to enter a fandom and a description of your prompt. In some challenges, you may be allowed or required to enter a URL - for example, a link to an image for an image prompt.

Note: In all the fields except the URL and description fields, you will only be able to choose 'canonical' tags that are already in the AO3 system (the set of available tags may have been limited further by the challenge owner). These will come up in the autocomplete when you start typing.

You can choose to make your prompt 'semi-anonymous'. This means that your prompt will be displayed as 'anonymous'; however, since it will still be linked in the database with your username, we can't guarantee 100% anonymity - in some circumstances, such as a coding bug, it might be accidentally revealed or guessable. (We've put a lot of work into minimising the risk, but we want to be sure that our users are completely informed about their levels of privacy.)

Once you have filled in your prompt, you can add more. When you're done, press submit!

Managing your prompts

Once you have signed up and created some prompts, you can manage your prompts by going to the collection's home page, e.g. http://ao3-rd-3.onrender.com/collections/collectionname and accessing 'Your Prompts' (usually displayed in the left-hand menu). Here you can edit your existing prompts, add another prompt, or delete your signup.

Please note: Selecting 'delete' on this page, will delete your entire signup, including all prompts. If you want to delete just one prompt, go to the list of all Prompts (select 'Prompts' in the left-hand menu), where your prompts will display with a 'Remove' button next to them.

Browsing and claiming prompts

You can browse all the prompts in a challenge by going to the collection's home page, e.g. http://ao3-rd-3.onrender.com/collections/collectionname and accessing 'Prompts' (usually displayed in the left-hand menu). When you see one you like, just select 'Claim'.

You can keep track of all the prompts you've claimed in a particular challenge by going to the collection's home page, e.g. http://ao3-rd-3.onrender.com/collections/collectionname and accessing 'My Claims' (usually displayed in the left-hand menu). Beside each prompt you'll see a button marked 'Post to fulfil' - if you click on this you'll be taken to the 'Post new' form with the details of the prompt filled in.

Filling prompts

Once you've claimed a prompt, you can 'Post to fulfil' the prompt from the main Prompts page. You'll be taken to the 'Post new' form with the details of the prompt filled in. Make sure it has just the right box ticked - we have one bug where it ticks extra random prompts as well, which will be fixed in the next deploy.

If you go directly to the 'Post new' form without clicking 'Post to fulfil', you'll see your claimed prompts under the 'Associations' section. Just tick the one you are filling in order to post the fill to the challenge.

Anonymous prompt fills

If the challenge maintainer has set the challenge to 'anonymous', then when you post your fill to the collection, it will be displayed as by 'Anonymous'. However, please note that at this stage you should consider anon prompt fills to be 'semi-anonymous', and your identity may be revealed under the following circumstances:

  • The challenge maintainer can see your identity
  • An author search will reveal anonymous works which may enable people to guess what you wrote
  • A tag for the fandom you wrote the anon work in will appear on the list of fandoms on your user homepage, which may enable people to guess what you wrote.

We're working on introducing enhanced anonymous features, but in the meantime you should be aware of the above issues: if it would be problematic for your authorship of a work to be revealed, you shouldn't rely on the Archive's anon option.

Happy prompting!

Comment

Post Header

Published:
Mon, 11 Jul 2011 16:47:12 +0000
Tags:

Please note: Prompt memes are still at alpha stage and are in active development, so you may run into bugs. We're also still refining the user interface. More improvements coming soon!

A prompt meme challenge is a collection where participants leave prompts for other writers to use in a fanwork. It can be open or closed, anonymous* or not.

The basics

Getting started

To set up a prompt meme, go to the Archive's main Collections page. You must be signed in to open a new prompt meme challenge. Click on the "New Collection" button.

Required settings

You must pick a name for your new prompt meme. This will be the name the Archive associates with your collection. It is used in urls, so the name can only include letters (Latin characters), underscores and numbers.

You must pick a display title for your new prompt meme. This will be the title that is displayed to your users. This name can include spaces and non-Latin characters.

Optional settings

You may choose to upload an icon for your prompt meme. Icons icons must be 100 by 100 pixels in size. (You can upload larger or smaller images, but be aware they will be resized to 100 by 100.) They can be in jpeg, png or gif format.

If you want this to be one of a set of linked challenges, enter the name of a parent collection (must be a collection you maintain). For example, if you run a kink meme with several different rounds, you would create a collection called 'My Awesome Kink Meme' as the parent collection, and then make that the parent of subcollections 'My Awesome Kink Meme 2011' and 'My Awesome Kink Meme 2012'. All the rounds of your kink meme will then be linked together, and you can reuse the FAQ and profile from the parent collection instead of writing them again for each sub-collection.

Optionally, enter the email address where you would like to receive notifications about your prompt meme. If you don't enter an email here, notifications will be sent to the email associated with your AO3 account.

Optionally, enter the URL for a custom header image if you want one for your collection.

Choosing your settings:

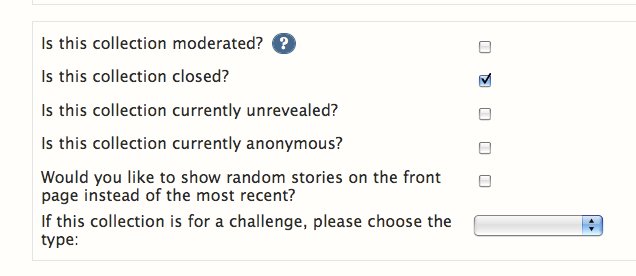
Check the box if you want your new prompt meme collection to be moderated. You probably want to leave it unmoderated so you don't have to approve every new story. Don't worry - you can still delete stories that aren't appropriate for your collection.
You may change your collection's status to moderated or add a new moderator or owner later.

If you close the collection, no new stories may be added to your prompt meme.

If you check the box to make the collection unrevealed, works will be hidden until you reveal them.

If you check the box to make the collection anonymous, authors will be listed as "anonymous," but will be visible to you. (At this time there is no way to make a completely anonymous collection where even the mods can't see the identity of authors.)

To make your collection a prompt meme challenge, you must select "Prompt Meme" from the drop-down box labeled, "If this collection is for a challenge, please choose the type.'

Additional information

Optionally, fill in the text boxes (plain text with limited html) with your desired Introduction, FAQ, and Rules. You have 100000 characters for each. If your challenge has a parent collection, then it will inherit information from that for any of these fields that you leave blank.

Optionally, you may enter a custom message for the emails sent out with Gift Notifications - i.e. the notification users will receive when someone fulfils their prompt. You have 1250 characters. (There is also a box for custom text for Assignment Notifications, but these don't apply for prompt memes.)

Finishing your new prompt meme:

You must click the "Submit" button. If you don't, all your changes will be lost.
Not to worry: you can edit your prompt meme's settings later.

Once you click 'Submit', you will be taken to a second setup page where you can open signups and tweak the settings for your challenge.

Opening and customising your prompt meme challenge

Opening the challenge and setting the schedule

By default, your challenge is set as closed. When you're happy with your settings, tick the box to open signups. If you want to run the challenge for a limited period, you can close the signups again whenever you're ready.

You can enter key times and dates for your challenge - opening and closing times for signups, author reveals if applicable, and the deadline for responses.

Please note: Currently the dates are provided only for information. You will need to manually open and close signup.

Prompt settings

If you want to run an anonymous prompt meme, you can set prompts to be anonymous by default (participants can choose to deanon if they want to).

You can set a minimum of prompts per sign-up, and a maximum number of allowed prompts.

Request settings

In this section, you can set requirements for what prompts must include. By default, all prompts are set to allow one fandom, one character and one relationship, and allow a detailed description, but you can change these settings however you want!

If you'd like to allow or require people to include a url in their prompt (for example, you want to run an art prompts challenge where people link to the prompt images, select that option here.

Tag options

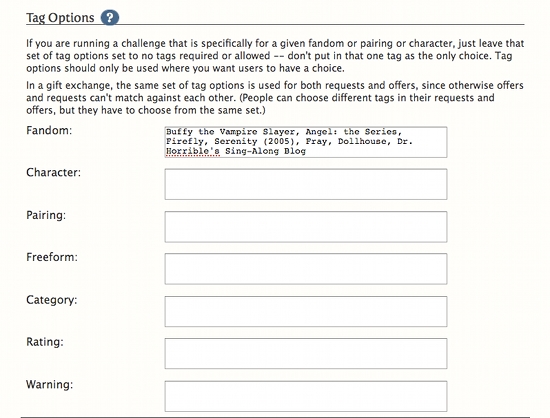
If you want to, you can define what tags people can choose from when making their prompts. These options are mostly useful for gift exchanges (where you want to be sure people are using a defined range of tags for matching purposes) - if you'd like more information on tag options check out the tutorial on setting up a gift exchange.

Signup Instructions

You can enter custom signup instructions to help people participating in your challenge. If you have edited the settings on this page - e.g. to require participants to give at least two characters - make sure you mention it here. You can also give separate instructions for prompt formats, if required.

The boxes 'Label to use for Prompt URL in requests' and 'Label to use for Description in requests' allow you to change those to say what you want people to use those fields for - e.g. linking to an image for an art prompt.

Finishing your prompt meme setup

Whe you're happy with your settings, hit 'Submit' and they will be saved. You can go back and edit at any time.

Congratulations! You have just started a new prompt meme. Enjoy!

NB: A note about anonymous challenges:

In order to track works in a collection, authors can always be seen by the collection's moderator and by the AO3 coders and may be accidentally revealed by a moderator error or software bug. The Archive currently cannot support a totally anonymous prompt meme.

Comment

Post Header

Published:
Sat, 12 Feb 2011 22:19:59 +0000
Tags:

So you want to apply some formatting to your fics! You probably already know how to use some basic HTML tags to make stuff <strong>bold</strong> or <em>italic</em>. But perhaps you want something a bit more complex - a different font, or maybe a different color. You can do this by creating some custom CSS for your works!

Cascading Style Sheets are a way to style elements of your story (or any webpage) without having to mess with the HTML markup itself. Where you used to scatter <font> tags all over your code to make some text look like this and some like that, you would now simply assign names (classes or IDs) to parts of your webpage and do all the styling in a separate document (the stylesheet). The upside of this is that if you decide to change the look of your page, you don't have to comb through the HTML code and change all the tags, you can just play around with the CSS rules until you find a style you like.

As is so often the case, things are a lot more complicated once you really dive in, especially if you use CSS to position elements on a page, but this shall not concern us here. You will most likely use CSS to apply a little formatting to your fic that goes beyond the allowed HTML tags, which is what this tutorial will be about.

The Basics

You may have already used Archive skins to change the way the Archive as a whole looks to you when you are logged in. Formatting a work uses the same basic principles: to apply styles to your fics, you create a "work skin" and define what classes you want to use in your stories and what they should look like. And while the general archive skins only affect the user that created them, the styling that you define for your fics will be visible to all readers (unless they disable custom styles; more on that later).

There are three HTML tags you might need in your works:

<div> - creates a container for all sorts of content
<p> - wraps around a paragraph and creates a blank line before and after it
<span> - is used for styling some words or phrases within a paragraph

To apply formatting to your story, you assign a class name to the HTML element in question and create rules for that class in your CSS skin. That sounds way more complicated than it is, so have an example:

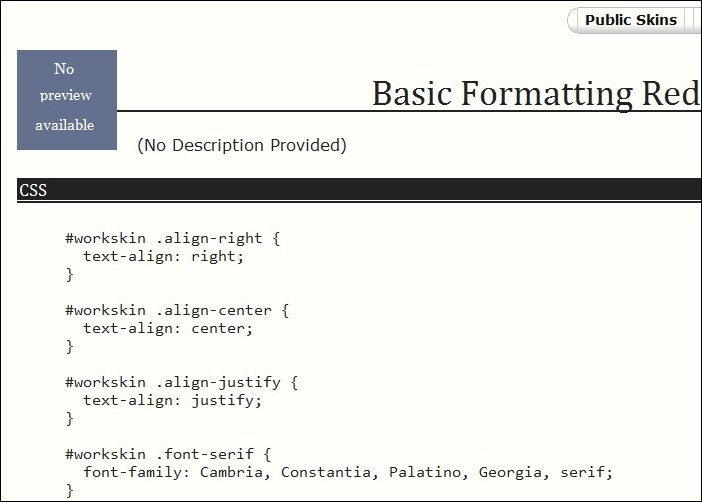
Under Dashboard > My Skins > See Work Skins Instead you'll see a work skin like this, with CSS rules defined.

Screenshot of a work skin, showing example CSS

The #workskin at the beginning of each line is an id, and is added automatically. It makes sure that the CSS can be applied to your whole work, and isn't applied to the rest of the page.

The words which begin with a period, like .align-justify are classes. These allow you to create a specific rule and apply it to a specific bit of your work. When you define these in your work skin they must have the period at the beginning.

When you edit a work, you'll use markup like this to apply the CSS rules in your work skin.

Screenshot of the edit work page, showing the HTML markup needed to apply the CSS

(Note: There is no need to apply <p> tags to your whole work, just add tags and classes where you need them and leave the rest alone; the parser should take care of everything else. The Tutorial on HTML Sanitizing and Parsing has more information on marking up your works; however, we are aware of some issues with how the parser behaves right now and are working on fixing those. If you run into wonky-looking text in your own stories, do a quick check if the paragraph in question starts with a <p> tag and ends with </p>. If not, adding those yourself will usually take care of the problem.)

Caveats

If you style a story so heavily that it becomes unreadable or if the reader simply doesn't agree with your font choice, there's a "Hide Creator's Style" button on top of each work that will strip out all bells and whistles except for the basic HTML formatting. CSS formatting will not appear in downloads (.pdf, .epub or .mobi files) either. Keep this in mind when you apply CSS to structure your story and make sure it doesn't fall apart when all CSS is stripped out.

CSS formatting is a great way to enhance certain elements of a story, such as letters in an epistolary fic or character voices in a story that's told from two points of view, but it shouldn't overshadow the actual contents of the fic. Sometimes you really just want a <strong> tag. Conversely, while there is an option to "Hide custom styles on works" under Preferences, which will hide all CSS by default, you might lose out on some really neat stuff if you never see it in action.

Examples

You can find an example stylesheet under Public Work Skins that comes with the most common formatting options already in place. Chances are, if you just want to change some text alignment or font colors, you won't even need to build your own stylesheet. Of course, you can also add more classes or create separate skins as you go. The world is your oyster! Just don't forget to pick the skin from the "Custom Stylesheet?" dropdown when you post.

Let's have a look at some CSS classes.

-

#workskin .align-justify {
text-align: justify;
}

This will make your fic appear as justified text, i.e. neatly aligned on both sides, if you do this:

<div class="align-justify"> Your story goes here. </div>

-

#workskin .font-serif {
font-family: Cambria, Constantia, Palatino, Georgia, serif;
}

This will make a paragraph appear in Cambria if your reader has that font installed on their computer. If not, it will try for Constantia and so on, until it has to fall back on that reader's default serif font, which will be Times New Roman in a lot of cases. To do this, use the following in your fic:

<p class="font-serif">Your paragraph goes here.</p>

-

#workskin .font-orange {
color: orange;
}

This will turn a word in your story orange for the following code:

This is an <span class="font-orange">example</span> sentence.

-

Achtung! Keep in mind that the parser will interpret all carriage returns as linebreaks, so don't use new lines to make the code easier to read for you. They will get turned into <br /> tags.

Where you can use CSS

You can use CSS to style the main body of your work, and in notes fields. You can't use it in summaries, because these show up in indexes, where user-input CSS is not supported. So, if you want to use styled text to include warnings or spoilers, you'll need to put these in the notes field.

Practical Uses

To see how this all works in practice, check out our example story Sliding Doors.

The default display for the work will show you the CSS in action, giving a two column display. If you click 'Hide creator's style' then the CSS styling will be suppressed and you'll see the basic text. As an added bonus, you'll also see the HTML tags which were used to style each bit of the text. The CSS style rules are at the bottom of the page, so you can see how these match up to the HTML and how they were applied to the work. (Note: HTML tags won't normally be revealed when the creator's style is hidden - this was achieved with a bit of extra CSS magic for the purposes of the tutorial.)

Other Frequently Asked Questions About Styling Works


Can I use inline CSS?

No, sorry. We've chosen to limit CSS to work skins in order to preserve the separation of style and content. By creating reusable classes for your fics you can control all your formatting in one stylesheet, and we can easily strip your CSS from a story (important for accessibility reasons) without interfering with the site caching (important for performance reasons). Everybody wins!

Do I need a separate skin for every work I post?

No. The formatting rules you define in one stylesheet can be used and re-used in any of your fics. However, if you have a series of stories that rely heavily on CSS for consistent formatting, it might make sense to create a separate skin just for that set of stories.

What if I never want to see styling on other users' works?

Check the "Hide custom styles on works" box in your Preferences. Alternatively, you can disable styles on a case by case basis by clicking the "Hide Creator's Style" button above the story header.

Will the custom CSS also be applied to file downloads?

No. The files you download (pdf/html/epub/mobi) will have no CSS formatting.

Tutorials and References

For more help on using CSS for styling, you may find the below sites useful. CSS is used to style all modern websites, so there are lots of resources out there (and it's well worth learning a bit about it).


Comment

Post Header

Published:
Fri, 12 Nov 2010 04:11:40 +0000
Tags:

Along with the upgrade to Rails 3, there have been significant changes and improvements to our HTML sanitizing and parsing in Release 0.8.2. These changes should make things clearer for authors and much faster for readers!

Here is a quick breakdown for those who just want the highlights, followed by a more detailed explanation of what was changed and how it all works.

Highlights

  • Blank lines and carriage returns will now be converted to paragraph (<p></p>) and line-break (<br />) tags in the text editor.

  • The text will automatically be parsed and "cleaned up" -- any tags that were left open get closed, any mis-nested tags get fixed, etc.

  • The text will be sanitized, to remove any elements that are potentially harmful to our server.

  • This change fixes the known bug where switching from HTML mode to Rich Text mode causes all your paragraphs to disappear. (Yay!)

  • This change will also allow users to embed video from: youtube, vimeo, blip.tv, dailymotion, viddler, metacafe, and 4shared. (Yay!)

What's Behind the Scenes

The new back end for content works in three steps.

  1. There is now a paragraph-adder that converts blank lines and carriage returns into paragraph tags (<p></p>) and break tags (<br />) based on a few simple rules:
  • A blank line left between two pieces of text will be made separate paragraphs:
  • Here is paragraph one.

    Here is paragraph two.

    will become:

    <p>Here is paragraph one.</p>

    <p>Here is paragraph two.</p>

  • A carriage return or newline in the middle of text will add a break tag:
  • Here is a line
    with a carriage return in the middle.

    will become:

    Here is a line <br />
    with a carriage return in the middle.

  • We also will preserve extra blank lines -- if you have TWO blank lines in a row, we will add in an empty paragraph:
  • Here is paragraph one, and I want extra space after it.

    Here is paragraph two.

    will become:

    <p>Here is paragraph one, and I want extra space after it.</p>

    <p> </p>

    <p>Here is paragraph two.</p>

  • Note: The paragraph-adder will put <br /> tags at the end of each line whenever there is a carriage return, even in things like lists. So, if you have a nice chunk of HTML in your story that you coded up by hand like this:
  • <ul>
    <li>Item one.</li>
    <li>Item two.</li>
    </ul>

    You can avoid having <br /> tags added by putting the list into a single line with no carriage returns instead:

    <ul><li>Item one.</li><li>Item two.</li></ul>

  • The next step is a Ruby on Rails gem (basically a kind of plugin) called Nokogiri, which parses the text and gives it back to us as a well-formed chunk of XHTML. What this means among other things is that:

    • any tags that were left open get closed

    • any mis-nested tags get fixed (eg, if you do <strong><em>foo!</strong></em> Nokogiri will turn that into the correct version (<strong><em>Foo!</em></strong>)

    • any attribute values that aren't properly in quotes get fixed


  • Finally, we use the gem Sanitize to clean up this XHTML and take out anything that is legal but not necessarily safe. Sanitize uses a whitelist, meaning that only the tags and attributes we specifically tell it are allowed are let through. It's very customizable, and we have been able to write special rules for Sanitize to safely allow embeds of videos from specific sites (currently: youtube, vimeo, blip.tv, dailymotion, viddler, metacafe and 4shared.) Once Sanitize is done, the final version is saved into the database.

  • There is lots of documentation available on Nokogiri and Sanitize on their respective sites.

    What you see when editing

    • If you are working in a field (like content in the Post New Work form) that allows you to use the Rich Text Editor, the tags <p> and <br /> will show, because otherwise if you switch to the Rich Text Editor, it will do that horrible thing where your whitespace disappears and your text all runs together into one giant blob!
    • If you manually put in some <p> tags that had extra attributes on them, like "<p align=center>", the tags will show.
    • The <p> and <br /> tags will not show when you edit fields like notes and summary, however, where there is no option to use the Rich Text Editor.

    Here's an example of how the tags will look on content in the Post New Work form:

    Comment

    Post Header

    Published:
    Sun, 12 Sep 2010 23:12:20 +0000
    Tags:

    Skins are here at long last! You can now choose how the Archive displays fonts and colours when you're logged in to your account. So, if you'd like a larger font, or you want lower contrast, or you just really love the colour green, you can tweak the Archive to look how you want it to look.

    Please note that the skin you choose only affects how you see the Archive, not how your works display to other people.

    What is a skin?

    A skin is a Cascading Style Sheet (CSS) file that changes how a webpage displays in your browser. Skins change font size, font face, and display colours for each user, providing a reading experience customized to your wants and needs.

    Who creates skins?

    The Archive coders have a few site skins ready-made for you. You can also create skins for yourself (more details follow), and use skins created by users which have been publicly shared.

    How do I change my skin?

    You must be a logged-in user to use skins. There are two ways to change the skin you use for the Archive:


    • Go to 'My Preferences' under your user home. Under the 'Site Display' section there is a drop-down menu where you can choose from all approved and publicly available skins, as well as your own skins. Simply select the skin you want and select 'Update'.

    • Go to the Public Skins page where you can view all publicly available skins. Select the skin you want by clicking the "Use" button. The page will reload using the selected skin.

    How do I create a skin?

    Skins are created using CSS (Cascading Style Sheets). If you've never used CSS before, fear not - it's easy to pick up the basics. We also have a Skins Wizard to help people who are unfamiliar with CSS - this is still in beta, and we'll be adding more options to this in the future.

    Creating a skin using Custom CSS


    • Go to 'My Skins' under your user home and select 'Create New Skin'. By default, you'll be taken to the page for entering Custom CSS.

    • You can use a limited range of CSS properties and values. The full range of allowed CSS is listed under the Archive Interface section of our FAQ, or you can select CSS help (accessible via the blue question mark) to access the list of allowed properties and values directly on the page. You can also use the Allowed Value Autocomplete to check whether a particular value is allowed - just start typing the value and see whether our autocomplete recognizes it. For example, typing 'lemon' will bring up the value 'lemonchiffon', one of our allowed colour values.

    • Your skin title is a short descriptor that lets you remember what this skin is like. You can enter more detail in the Description field. Then you input the CSS you want. You can also add a preview image - this is entirely optional for private skins, but you must include a preview if you want to submit the skin for public use.

    • If you check the 'public skin' box, it will submit your skin to be added to the site skins available to everyone. Our volunteers will check it over to make sure it is appropriate, and then add it to the public skins. Please note: Once a skin submitted as public has been officially approved, you will no longer be able to edit or delete it. Please be sure you are happy with this before submitting a public skin! Please also note that not all skins will be approved.

    • When you've filled in all your choices, select 'Create' to save your skin.

    • Once you have saved your skin, it will appear as an option in the drop-down menu on your preferences, and will show up under 'My Skins'.

    • Select your new skin as described under 'How do I change my skin?'

    • If your skin is not public, only you will see it in the drop-down menu in 'My Preferences', and only you can access it.

    If you need help writing custom CSS you can browse the code of existing skins under Public Skins to see examples of the kind of code you can use. There are lots of great general resources for CSS online - we recommend the W3 Schools CSS tutorials as a great place to start. There's also an unofficial AO3 skins community on Dreamwidth - check out [community profile] ao3_skins for other shareable skins and help and advice from other fans.

    Creating a skin using the Skins Wizard

    Please note: This feature is in extreme beta and lots more spiffy user-friendly features will be added in the future.

  • Go to 'My Skins' under your user home and select 'Create New Skin'. By default, you'll be taken to the page for entering Custom CSS - select 'Use Wizard Instead?'


  • There is a list of basic options which you can fill in to suit your preferences:


    • Skin title: A short descriptor that lets you remember what this skin is like.

    • Description: this is where you can put more detail about the skin.

    • Width of margins: This will set the width of the margins on works pages (i.e. when you are viewing a story). The default is 3 - using a bigger number will give you bigger margins, and a smaller number will make the margins smaller!

    • Font, with comma-separated fallbacks: This will set the font used for all body text (e.g. works, summaries, etc but not titles or headings). Just input the name of the font you would like to use. If that font is not installed on the computer you are using, then the Archive will 'fall back' to your next favourite font - either the next font in your list, or the Archive's own default fonts. For example, if you put 'Papyrus, Comic Sans' then the Archive will display in Papyrus if you have it, but if it doesn't find Papyrus on your machine it will display in Comic Sans instead.

    • Background colour: This will set the main background colour for the Archive, i.e. the main page colour. You can specify the name of the colour you want, or for more control use the hex colour code - the W3 Schools list of colour codes lists the most common of these.

    • Foreground colour: This will set the font colour for the Archive. You can specify the name of the colour you want, or for more control use the hex colour code - the W3 Schools list of colour codes lists the most common of these.

    • Relative font size: This will set the size of your font. The default is 100 - if you pick a number bigger than this, the font will enlarge. If you pick a number smaller than 100, the font size will decrease!


  • When you've filled in all your choices, select 'Create' to save your skin.


  • Once you have saved your skin, it will appear as an option in the drop-down menu on your preferences, and will show up under 'My Skins'.


  • Select your new skin as described under 'How do I change my skin?'


  • Skins created via the Skins Wizard cannot be submitted as public, so only you will see you skin in the drop-down menu in 'My Preferences' and only you can access it.


  • How do I add a preview image for my skin?

    Create a screenshot of how the Archive looks while using your skin and save it in PNG, JPEG or GIF format. Edit the skin and use the Browse (or Choose, in some browsers) button to navigate to your image. Click Update. The image will appear as a clickable thumbnail, leading to the original image.

    What happens when I submit a skin as public?


    1. The skin will be added to a list for review by Archive admins, and will appear as 'Pending approval' on your Skins page.

    2. An Archive admin will review the skin for security, accessibility, and innovation and decide whether or not it should be added to our range of Public Skins. Please note that skins will not be reviewed immediately, and not all skins will be accepted.

    3. The admin will decide whether to approve or reject your skin:


    • If they accept the skin, it will be marked 'Approved' on your Skins page and added to the range of available Public Skins. You will no longer be able to edit this skin. The admin may add a short comment which will also be visible on your Skins page - this will not be visible to other users.

    • If they reject the Skin, it will be marked 'Rejected' on your Skins page. The admin will usually add a short note explaining their decision.


    What if I want a particular skin?

    If you want a particular design for the Archive, you can create it yourself! If you don't have the skills, you can browse Public Skins to see if someone else has created something you like. You can also try asking at the unofficial [community profile] ao3_skins community for help.

    If you have particular accessibility needs which you think might be met by a skin, then get in touch with our Support team for help. (We can't create custom skins for individual users, but we are keen to develop skins that will address issues for groups of users, particularly where accessibility is a factor.)

    As always, if you have questions about how skins work or hit a problem, our Support team will be happy to help. Go forth and customise your Archive!

    Comment

    Post Header

    Published:
    Thu, 12 Aug 2010 20:21:12 +0000
    Tags:

    Creating and editing a collection

    So, you've decided to run a gift exchange challenge. Awesome. Here's a guide to help you get started.

    1. Go to the Collections tab and click New Collection.

    A gift exchange is run within a Collection.

    New collection button, black text on white. To the left are Title, Date and Size buttons.

    2. You should see this screen:

    Screen headed New Collection, with suggestion text and a series of text boxes used to set up a new challenge.


    • Select owner pseudonym(s): Which pseudonym you'd like to be shown as the owner of the collection.

    • Icon: The icon (if any) you'd like to represent the challenge.

    • Parent collection: If this is a sub-set of another collection (for example, one year of a challenge that has been run for multiple years), enter the parent collection here.

    • Collection name: the name of the collection. For example, Annual_Example_Challenge_2010. This will define the URL (web address) of your challenge so there can be no spaces.

    • Display Title: For example, Annual Example Challenge 2010. There can be spaces here.

    • Email: If you've got a separate email address for running the challenge enter it here. If you haven't, by default email messages will go to the challenge owners.

    • URL for custom header: If you'd like to have a custom header for your challenge, enter the URL where the image can be found on either your own webspace, or that of a photo sharing site.

    • Brief description: A brief description of your challenge, which will show on the Collections main page and the Profile page.

    Series of tick-boxes with options for seting up a new challenge.


    • Is this collection moderated?: Tick this if you would like your collection to be moderated. If a collection is moderated any registered user can post to it, but all works must be approved by a moderator or owner.

    • Is this collection closed?: Tick this if your collection is Closed. If a collection is closed, no one can post to it. Remember to open it when asking people to post their works.

    • Is this collection currently unrevealed?: Tick when you would like to hide your challenge entries, untick when you would like to reveal them.

    • Is this collection currently anonymous?: Tick if you would like your challenge's works to be anonymous. Untick to reveal the authors of the works.

    • Would you like to show random stories on the front page instead of the most recent: Tick this if you'd like to show random works on the home page of the collection instead of the most recent.

    • If this collection is for a challenge, please choose the type: Select gift exchange from this drop down menu.

    The next three optional fields are where your Introduction, FAQ (Frequently Asked Questions) and Rules can be entered. These will appear on the Profile page. However, the Rules and FAQ become their own menu entries on the left-hand side once entered so they can be easily found by your participants.

    Menu with Dashboard at the top in white on black text, followed by menu items, Profile, FAQ, Rules and Parent Collection below.

    Note: If you are creating a sub-collection these will be inherited from the parent collection by default, but anything you enter in this sub-collection will take precedence.

    Gift Notification Message: In this field you can create a custom message that will appear in the emails when works are revealed and participants are notified of their gift. This is optional.

    To alter these at any time go to the Settings menu item, or select the Settings button at the bottom of the Profile screen.

    Black on white row of buttons. Signups button to the left, with Challenge Settings, Settings, Delete and Delete Challenge to the right.

    Membership

    Depending on what sort of challenge you're running and its size, you may want to assign moderators and tightly control who can post to the collection. This is done on the Membership screen.

    To go there click the 'Membership' button on the challenge's dashboard or Profile page.

    Black on white row of buttons, Profile, Membership and Manage Items, from left to right.

    By default you will appear as an owner of the challenge. You can have multiple owners if there is someone or a few someones helping you run the challenge. Everyone you assign a role to must have an AO3 account. When you enter a name the site will search for AO3 user names.

    The roles it is possible to assign are:

    • Member: This person can post works to the challenge without prior approval.
    • Moderator: This person can approve/reject works, and add members.
    • Owner: The owner can approve works, assign pinch-hitters, and alter the sign-up form and FAQ and Rules fields. You can have multiple owners.


    • Invited: This functionality has yet to be rolled out.

    Note: By default, all registered users can post to a challenge, being a member of a challenge just means that they can post to a moderated challenge, and their work will be accepted without moderator approval.

    Sign-Up Form Settings

    To set up the challenge sign-up form go to Challenge Settings, this is near the bottom of the left-hand side menu.

    Menu with Dashboard at the top in white on black text, followed by menu items Profile, Parent Collection, Your Signup, Signups, Matching, Fandoms, Works, Bookmarks, Random Items, People, Tags, Challenge Settings which is highihgted in red with white text, and Settings.


    You should see this page:


    Sign up form headed 'Setting up the 2010 Example Challenge Gift Exchange. Below that is paragraphs of suggestion text and then a Schedule heading with a series of drop down menus with times.


    Schedule

    To set up the timings of your challenge, use the Schedule.

    Close-up of Schedule drop down menus with a sign-up open tick box at the top which is not selected.

    These times are only for information and will not automatically open sign-ups, close sign-ups or reveal works. This will all need to be done manually.

    The times will appear on the Profile page of the challenge.

    Sign Ups Open?

    The Sign Up open tick-box is where you open or close sign-ups. Leave this box unticked until you have your sign-up form ready.


    tickbox with sign up open? written beside it. it is not selected.

    Requests and offers

    Request and Offers sets the number of requests and offers you'd like the participants to use. You can set a required number (how many they need to have) and an allowed number (what is the maximum number they can have).

    Two rows of two text boxes with Required 1 and Allowed 1 on the top row, and Required 1, Allowed 2 on the second.

    In the example above, participants must be make at least one request and offer, but can make two separate offers if they chose.

    Then, you have to set the tag settings for the requests,

    A series of text boxes listing field names with a field beside each one for Required and Allowed numbers.

    and offers.

    Another series of text boxes listing field names with a field beside each one for Required and Allowed numbers.

    These will define what a participant's requests and offers can contain.

    • Optional tags: Click this if you would like to allow optional tags. These are tags that participants can add which will be matched on if possible, and allows your participants a little more flexibility with their requests and offers.
    • Details/Description: Tick Required if your challenge needs to include more details than just a relationship or fandom, and Allowed if you would like to give participants the choice to include more details.
    • URL : Tick Required if your challenge needs a URL (for example, where the participants works are archived) or Allowed if you would like to give participants the option of including one (for example, a link to a Yuletide letter).

    You can leave both of these blank if you like and select neither box.

    Now, you can define how many fandoms, relationships, or ratings participants are allowed to chose.

    To do this enter numbers into the required and allowed boxes. You do not have to fill in all of these, and if you are using automatic matching it will take a longer time to match them if you fill in too many.

    If you are running a challenge that is specifically for a given fandom or relationship or character, just leave that set of tag options set to no tags required or allowed -- don't put in that one tag as the only choice. Tag options should only be used where you want participants to have a choice.

    Next you can define what tags people can chose from when making their requests and offers.

    Seven text fields. Character, Relationship, Freefrom, Category, Rating and Warning are all blank, but Fandom has a series of fandoms listed in in separated by commas.

    In the example above, participants can choose from any of the fandoms listed in the fandoms field. Anything entered in these fields should be comma-separated and will auto-fill.

    Close up of Character text field. Buff is typed with auto-filled fields showing below listing, Buffy Summers, Buffybot, Pheobe Buffay ...

    Note: In all of the fields, you will only be able to choose canonical tags that are already in the AO3 system. If you wish to include a fandom, relationship, character or additional tag (freeform) which is not already in the system, please contact the Tag Wrangling Committee through the Support and Feedback form or via the Tag Wrangler's twitter account, @ao3_wranglers. When possible, the committee asks that these requests be lodged at least one month before opening a challenge, to give tag wranglers time to review and add necessary tags. The Committee can also add additional tags (freeforms) for members to add to their posted works as required.

    .

    The next set of drop-downs determined the minimum level of matching that must occur in each field. That is, how many characters or fandoms must match between the participants to consider them a match. The simplest option is to chose to match them on Requests, meaning anyone with a Request matches another person with a Request, but this may not work for more complicated challenge with a variety of different tags in use.

    Image:List of drop down menus with numbers for minuimum number of matches to make. List includes Requests, Fandoms, Characters, Relationships, Freeforms, Categories, Ratings, Warnings.

    If you leave a 0 in the drop down it will not match on this field.

    Note: the most options that are chosen here the longer matching may take, and the harder it will be for matches to be found.

    Optional tags: If you chose to use optional tags above, you can choose what field(s) they are used to match on if possible.

    Next are three fields which define the challenge-specific instructions that will go with the sign-up form.

    You can also change the labels for the URL and Description fields if you are using them.

    Three large text boxes, and four smaller text boxes for changing labels in Sign-up form.


    For example, as seen above, if you are running a challenge where participants need to provide a link to where their fic is archived, you could call the field, 'My fic is located at:.'

    Remember: check the Sign-Up Form to make sure it's working how you'd like before opening it up for people to sign-up for the challenge.

    Now you're ready to open the sign-ups!

    To do this go to the Settings menu and tick the 'Signups open?' tickbox.

    Checking the Sign-Ups

    You can check the sign-ups as they come in by going to the sign-ups menu item on the challenge side-bar.

    Two rows of light pink boxes in a table with a summary of a sign up going horizontally.

    Here you can see what participants have chosen.

    To make the list easier to navigate (especially if you have multiple requests and offers) you can hide the descriptions using the Hide Descriptions button on the top of the screen. To bring them back click Show Descriptions.

    If you need to contact a participant for any reason you can click the envelope icon next to their username.

    Close up of a particpants name called aworldinside with Edit and Delete links to the left and red envelope icon to the right.

    If for any reason you wish to edit or delete a sign-up use the edit and delete links on the left hand side.

    You can also download an Excel spreadsheet of the sign-ups. To do this click the Download (Excel) button at the top of the screen.

    Close Sign-Ups

    Since the dates on the Schedule are provided only for information, you must close sign-ups manually.

    To do this go back to the Challenge Settings menu and untick the Signups Open tickbox.

    tickbox with sign up open? written beside it

    Sign ups are now closed.

    Generate potential matches

    Now you have closed sign-ups, let's do some matching for your gift exchange.

    Depending on the choices you made when you set up the Sign-Up Form this may not be necessary, or you may chose to manage the assignments manually. If so skip through to Adjusting Assignments

    To generate matches go to the Matching menu.

    There will only be information here once you have closed sign-ups.

    Matching menu item selected to the left, with a matching screen to the right. Headings for Pseud, Giving Gift to, Assigned Giver, Potential Gifver, and Write in Pinch Hitters. There are nothing below them.


    Click Generate Potential Matches.

    If your challenge settings mean that you don't require automatic matching, you will get a warning that the automatically generated matches will be at random. Click OK if you wish to continue.

    Grey warning box with Blue circle with a white question mark to the left.


    Matching can take a while depending on how big your challenge is and the criteria you have set.

    You will receive an email when the matching is complete.

    The matching screen should look something like this:

    Pink table with partipants names to the left, with names under Giving Gift To, drop down menus under Assigned Giver and a link titled Show 13 under Potential Givers. A field titled Write in Pinch Hitter is on the right.

    Adjust assignments

    You can adjust the assignments in two ways:

    1. Automatically

    To automatically adjust the assignments click 'Regenerate assignments' and the matching process will be run again.

    White button with black text titled Regenerate Assignments

    Note: Depending on your matching settings, this might not make a lot of changes to your assignments. If you alter something on the Challenge Settings Page then this may make more of a difference.

    2. Manually

    To adjust the assignments use the drop down menus.

    Image:Pink table with Assigned Giver drop down expanded.

    Note: If you adjust the assignments, they will not readjust automatically so that each participant has another writing for them. You will need to check them manually (or regenerate assignments).

    To see all the potential givers for any one participant use the links under the Potential Givers column.

    Image: Pink table with two row showing. One has Show 13 link expanded to show a list of participant names.

    Clicking on a potential users name brings up their sign-up.

    Image: Series of black text summarising a participants sign-up.

    Once you have finished click 'Update Assignments'

    White button with black text titled Update Assignments

    If you have any participants who don't have an assignment, it it will show up under 'Missing recipients'

    Assignments screen with extra box at the top under Missing Recipients. Drop down menu with a participant highlighted in blue under Pinch Recepient.

    Use the drop down menu to select the recipient and click 'Update assignments' and they will return to the main table.

    You can also chose to write in a pinch-hitter in the right-hand field. Pinch hitters do not have to be signed-up for the challenge, but must already have an AO3 account.

    Send assignments

    Once you are happy with the assignments, to send them to participants click 'Send Assignments.'

    White button with black text titled Send Assignments.

    All of the challenge maintainers will receive an email when the assignments have been sent to all participants.

    Managing Posted Works

    Once the assignments have been sent out you should now see this screen when you click Assignments (which has replaced Matching in the side menu).

    Light pink table with list of participants on the right, red envelope icons, and then list of who they are writing for. Work info says not posted for all participants. Tick boxes with Default on all rows. Not eelected.

    As participants post works this will be shown in this table.

    Image:Work-posted.jpg

    If you are running a moderated challenge, each work will have to be approved by an owner or moderator before it can be added to the collection.

    This is managed through Manage Items, which can be found on the profile page of the collection.

    White buttons with black text. From left to right: Profile, Membership, Manage Items.

    Use the drop-down menu under Collection Approved to either accept or reject the work.

    Pink table with a series of entries called 'awesome chalenge agan.' Creator column says aworldinside, Member column is Y, Creator approved column says approved. Collection approved drop down says approved, Unrevealed tick box is selected. On far right are two links, Manage and Delete.

    You also have to option to Remove a work, using the option on the right-hand side and to keep a work unrevealed from the rest of the collection using the Unrevealed tickbox.

    Works, once they are accepted, will be added to the collection (but will remain hidden until you reveal them) as well as any by users who are Members of the challenge and have therefore been pre-approved to post to it.

    If you are not running a moderated challenge, the works will be added to the collection automatically.

    Managing Defaulters

    If a participant has defaulted, use the tick box beside their name.

    Once they have been marked as a defaulter this will appear:

    Pink table with three rows under Defaulted Assignements. A pinch hitter field is shown blank. Three rows under Assignments appear below.

    To assign a pinch-hitter:

    Enter the pinch-hitter's archive username in the pinch-hitter field (again remembering they don't have to be already signed up for the challenge but do have to have an AO3 account). The field will auto-complete to check that the user has an AO3 account and this may take a second.

    Once you have done this click 'Assign' and an email with their assignment will be sent to them.

    Once a pinch-hitter has been assigned they will not appear on the main table on the Assignments screen, but will rather remain at the top of the screen in the separate pinch-hitters table. By default covered pinch-hits are hidden, and uncovered ones are shown, but to unhide covered ones click 'Show Covered Defaults.'

    Note: You can also default all participants who have not posted to the challenge by using the 'Default All Unposted' button at the top of the screen.

    White button with black text titled Default All Unposted.

    Close Challenge

    To close the challenge so no more gifts can be added, go to 'Challenge Settings' and tick the box beside 'Is this collection closed?'

    Tickbox with 'Is this collection closed selected. Is this collection currently unrevealed tickbox is unselected.

    You can of course chose to leave this open if you'd prefer. :)

    Reveal works

    It's time to reveal the works!

    To do this go to the Settings page for your challenge and untick the box that says 'Is this collection currently unrevealed? '

    You can leave the collection closed if you don't wish participants to add any more works.

    Tickbox with 'Is this collection closed selected. Is this collection currently unrevealed tickbox is unselected.

    You've successfully set up and run a gift exchange challenge on AO3. Congratulations! :)

    Comment

    Post Header

    Published:
    Tue, 16 Mar 2010 20:10:56 +0000
    Tags:

    You've done it - you've written your story for a challenge on the AO3! \0/ Congratulations. Now you just have to post it, and hopefully that will be easier than the writing was...

    1. The easiest way to post your work is to first go to the collection it's going to be part of. Be sure you get the right one! It's worth bearing in mind that many challenges which take place on a regular basis have subcollections for each specific challenge, in which case you need to be sure you go to the right subcollection. The fastest way to find a challenge you've signed up for is via the "My Signups" page, which is linked in the sidebar of your "My Home" page.

      A user's challenge signups page with a link to the collection and manage links

      In the example below, we're going to be posting a work to the "Awesome Exchange 2010" subcollection, which is the 2010 round of the "Awesome Annual Challenge" collection.

      Dashboard of the Awesome Exchange 2010 collection, with Profile, Post To Collection and signup managements links

    2. Clicking on the "Post To Collection" link will take you to the form for posting a new work, which you can fill out as normal. In the "Associations" section, you need to make sure that the name of the collection or subcollection you are posting to is listed in the "Post to Collections/Challenges" field. If you've come to the form by clicking the link on the collection's page, this will be added for you automatically.

      The Post to Collections or Challenges field on the Post New form, with awesomeexchange2010 filled in

      If you are participating in a gift exchange, you should enter the name of the person you've written your work for in the field immediately below that. The form will suggest possible matching names to you.

      Recipient field on the Post New form; paren has been typed in, and parenthetical is being suggested by the autocomplete

    3. Once you've finished filling out the form, you can preview and then post! \0/ Bear in mind that if the challenge is set to be anonymous or unrevealed, your work may only be fully visible to you. For example, you may see something like this:

      Author view of the blurb for an anonymous and unrevealed work; the work details are visible, and the author's name is listed in brackets after Anonymous

      If your work is currently anonymous, however, other people won't be able to see your name after Anonymous, and if it is currently unrevealed, other people will see only a "Mystery Work":

      Mystery Work blurb which is seen by other users; no details except the name of the collection are provided

      If you're nervous about whether this is really working correctly, one thing you can try is logging out and seeing how your work appears to you then - you should also then see the Mystery Work blurb or the anonymous blurb. The owner or moderator of the challenge will reveal your work when the time comes!

    Hopefully this should help to ensure that the process of posting your challenge fic goes smoothly, but if you run into any problems, please contact the Support team and we'll do our best to help!

    Comment

    Post Header

    Published:
    Tue, 16 Mar 2010 20:05:11 +0000
    Tags:

    Here's a quick guide to walk you through signing up for a gift exchange!

    1. First you need to find the challenge. You may be linked from elsewhere, but if not, go to the Archive's main Collections page.

      The main Archive navigation, with the collections tab active

      You can find a collection using the filter and sort options on the right:

      The collections sort options and filter box, with options to filter by title, fandom, closed, moderated and gift exchange

      The collection title and fandom fields offer autocomplete suggestions when you start typing.

      Filter By Title field - the word awesome has been typed in and the autocomplete is suggesting Awesome Annual Challenge

    2. Once you've found the collection you're looking for, you will see its blurb:

      Blurb for the Awesome Annual Challenge, showing its name, owner, a short description and its status

      Clicking on the title will take you to that collection's page:

      Dashboard of the Awesome Annual Challenge collection; a sidebar contains links to a subcollection, as well as to the collection's profile, rules and random items

      The links in the sidebar on the left allow you to view the collection's profile, read its rules, and view any subcollections it may have. If the collection is a challenge, the signup form will also be linked from the sidebar.

      Sometimes, however, a challenge which is held on a regular basis will have a subcollection for each round. That's the case in our example: the Awesome Annual Challenge contains a subcollection called "Awesome Exchange 2010", the home for this year's challenge.

      Dashboard of the subcollection Awesome Exchange 2010 with Sign Up link

    3. The challenge's sidebar will contain similar links to that of the parent collection. If you want to see when signups are due to open, check the Profile; it should list the important dates for the challenge (and if you've set your timezone on your Preferences page, it will even show you the exact times for your timezone as well). Once signups are open, there should be a link to the Signup Form in the sidebar, as well as in the navigation on the right.

      Exactly what is contained on the signup form for a gift exchange will of course depend on the exact nature of the challenge! The owner of the challenge should have added more detailed instructions for your specific challenge to the signup form, but there are some basic things to look out for.

      Normally, you will need to specify what your Requests - what you would like in the work created for you - and your Offers - what you are willing to write for the user you are assigned.

      Any fields marked in red are required, while the others are optional. In the example below, for example, you are required to specify a certain number of fandoms. The numbers next to the label indicate how many you need to select - "Fandoms (1 - 5)" would mean that you must select between one and five fandoms. "Characters (0 - 2)", on the other hand, would mean that you are not required to list any characters, but you have the option of listing up to two.

      An excerpt from a signup form. The label is red and reads Fandoms (1-5); three fandoms are shown with checkboxes, with a link below to show more

      In some cases, you may be required to choose from a predefined list. In the example above, the owner of the challenge has defined a certain number of eligible fandoms. Only a few are shown by default; clicking on the "X more fandoms to choose from" link will show the entire list.

      In other cases, rather than having to select from a predefined list, you will be asked to type into a field. In the example below, this is the case for the characters you can request. To request more than one, separate them with a comma. Please note that in cases like this, the autocomplete will suggest specific forms of fandoms and character names, etc - you need to use these 'canonical' forms of the tags on signup forms so we can be sure everyone is using the same version and match people up correctly.(Note that the 'canonical' tags are those that appear in the sidebar filters when browsing the archive, and in the auto-complete.) If you try to put in something else not in the autocomplete, you will receive an error. If characters or relationships you want to select are not appearing, you will have to contact the exchange's moderator.

      An excerpt from a signup form. The label is red and reads Characters (1-2); one character has already been typed into a text field, followed by a comma, with a new character in the process of being entered and the autocomplete suggesting possible names

      You could be asked to choose from a predefined list or to type in directly any of the following kinds of information. Very few forms will include all of the options below, however!

      • Fandoms
      • Characters
      • Relationships
      • Ratings
      • Categories
      • Freeforms
      • Archive Warnings

      Other fields which could appear in the requests and/or offers sections, depending on the challenge, include:

      • Prompt URL: If you are allowed or required to provide a link of some sort, this is where you'd enter it. Exactly what kind of link is expected will depend on the challenge, but it could be a link to a letter you've written to the person who'll be writing for you, or a link to your stories in a remix-type challenge, for example.

      • Description/Details: If you are asked to provide a more detailed prompt or other information, you would enter that here.

      • Optional Tags: This would be a space for you to add additional tags - for example, for things which aren't included in a predefined list for you to select from, or which fall into a category which doesn't appear elsewhere on the form. These optional tags will be used to try to ensure the best possible match with another user in the exchange, but they may be ignored if it isn't possible to match you using them. If you enter more than one additional tag, you should separate them using a comma.

        An Optional Tags field from a signup form; the tag Plotty has been entered, with the tag Schmoop being suggested via autocomplete as a new tag is typed in

    4. Once you've finished filling in the details of your offer and request, click the Submit button at the bottom of the page to sign up!

      You can view and edit your signup at any time after you've submitted it. On the sidebar of your "My Home" page, there is a "My Signups" section where you can view your signups for all challenges you're participating in.

      A small part of the sidebar on the user My Home page, with My Signups appearing below My Collections

    5. Success! Once the owner of the challenge has matched you up with a user to write for in the gift exchange, you will be notified by email.

    We hope that this will help you when signing up to participate in a gift exchange, but if you run into problems, please contact the Support team and we'll do our best to help!

    Comment


    Navigation